Pages

Monday, March 28, 2011

Child's Cupboard with a New Epoxy Base.

 Unfortunately, I didn't get any great shots of the front of this piece, and we got the project done so quickly, and it was picked up so quickly, that it was gone, before I even realized it was completed!  So, the pictures I have here, will have to work.

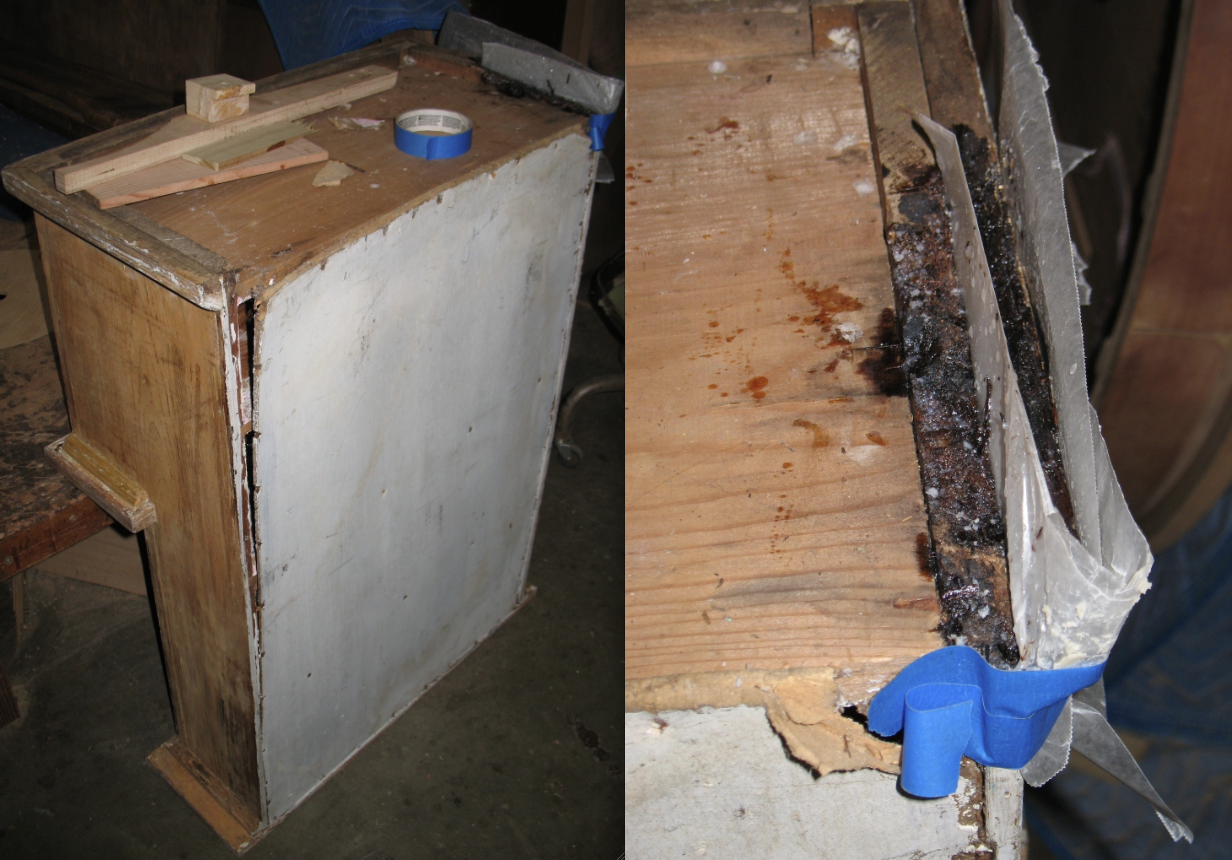
This is actually a child sized kitchen cupboard.  There were multiple repairs it needed, but the biggest one was a problem with dry rot on one side of the base.  We filled the rotted out wood with epoxy to give the wood stability again.  The wood was so rotten we had to apply the epoxy multiple times, as it kept getting soaked up.


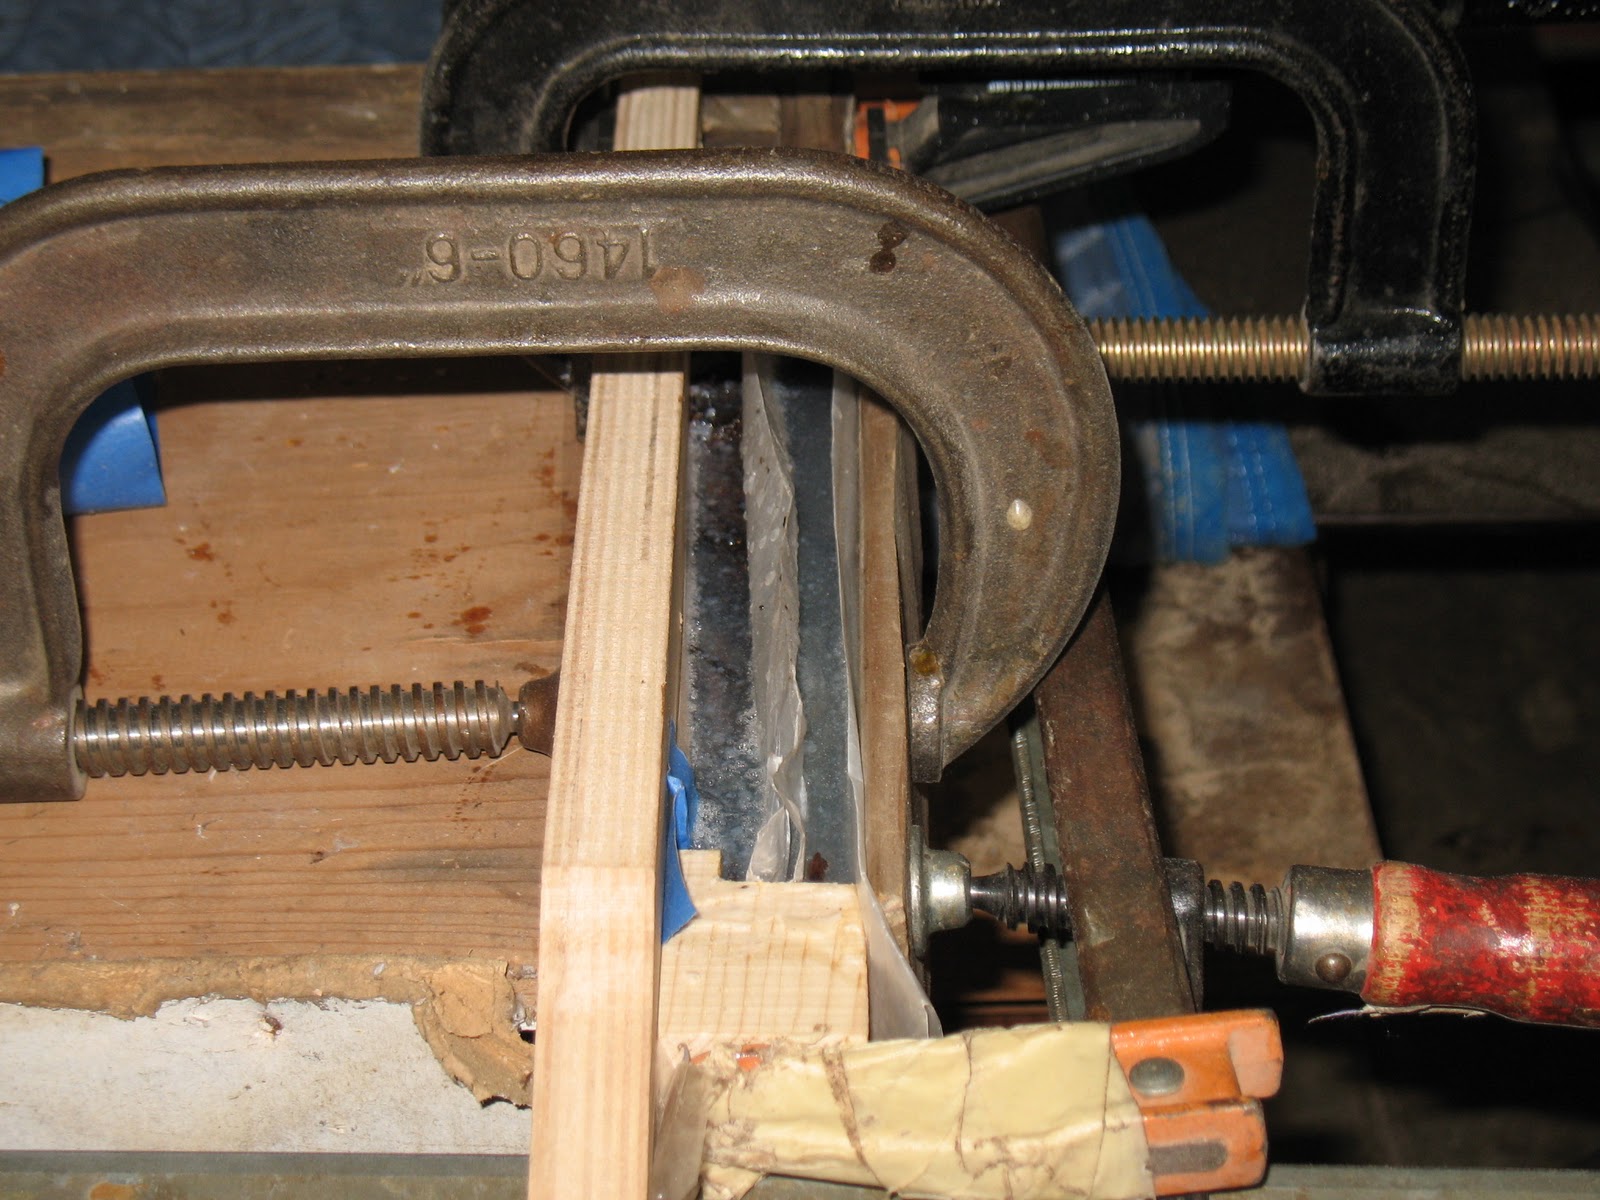
After the wood had soaked up all the epoxy it could,  we created a form out of waxed paper, wood scraps and clamps.  We then filled the form with even more epoxy, to make a new base, where the old wood had rotted and was gone.


Here you can see the cupboard's new base.  The old rotten wood has been filled, and the piece can now stand upright again.  Pretty impressive amount of epoxy there wouldn't you agree?  The owner of this piece has decided to undertake the rest of the repairs themselves, but we are happy we could help with this step at least.

Wednesday, March 23, 2011

Sacramento Antique Evaluation Day

So often our customers ask us to help them understand the value of the antique they have brought to us.  We always have to tell them, that while we can help them restore their beautiful piece, and even give them some clues as to the furniture's age, we are NOT appraisers and cannot give them a dollar value.  The good news is, there is an 'ANTIQUE EVALUATION DAY' coming to the Sacramento area.  We are sharing the information here, so that all of you inquisitive antique lovers out there can take advantage. The info is as follows...

Antique Evaluation Day
hosted by 'Welcome Home Housing' (a non profit organization raising funds to support mental health)

When:
Saturday April 9th,  11am - 3pm

Held at:
Unitarian Universalistic Society of Sacramento
2425 Sierra Blvd, Sacramento
Located between Howe and Fulton just north of Fair Oaks Blvd.

Antique experts and appraisers available for evaluation include Brian Witherell from PBS's Antique Road Show and Sacramento's Mr. Antique, Gary Cox

Is it Treasure or Trash? -Insure it or Toss it?
Bring your books, documents, paintings, photographs, jewelry, toys, posters, textiles, glass, china, pottery, dolls, decorative arts, armament, stamps, Indian artifacts, inherited items and garage sale finds for evaluation.

Suggested donation: One item $8 or 5 items $35 - Senior discount with flier: $5 for one item or 5 items for $30.


Benefit for Welcome Home Housing, A housing program for adults with mental illness. For information call Lynn,  916-505-5232

Broken Chair Magic Act!

We get all kinds of breaks to fix here at the shop, and we do a great job of repairing them.  Our fixes are solid, clean, and last a long time.  This chair had it's top corner broken off and you can see the repair we did in the top picture.  The problem with repairs, is that they never go back together in such a way that they become invisible. The glue takes up some space, and there are often minuscule voids on the edge of the broken wood section.  So it is up to the customer to decide if it is enough just to repair the damage, or if they also want us to perform touch up work, to make the area less visible.  The owner of this chair, decided that they wanted to pay the extra cost, and have us do a little chair magic.
You can see in the second picture that we sanded the area smooth to eliminate the small bumps that the broken sections made. We were then left with a small area right on the top and most visible part of the chair, that not only had two 'fault lines' but was  missing color!  Fortunately we have a master in this kind of touch up work.  He not only blended the fill color perfectly, but he made those cracks almost invisible.      Believe it or not, that third picture is of the chair after we did the color touch up!  Pretty good right? Would you guess that the chair had been broken?  Now I do have to tell you, that if you were the one who had brought this chair in,  you would still be able to look closely and find the damage, because you know where to look.  But for any guest of yours, who sat in this chair, they would have no idea it had ever been into our shop.  And that is a job well done!

Thursday, March 17, 2011

Custom Turned Spindles


This beautiful footboard is in a sad state.  Several of the spindles have come loose, and one has broken off and needs to be replaced.  You can't just purchase spindles in this beautiful turned style, so we had to make our own.  Our Repair Craftsman just did this turning today, and it looks great.  He took a dowel, the width of the widest part of the spindle, and using our Shopsmith Lathe (and some very careful markings)  he was able to re-create the shape of the original spindle nicely.  Now it is up to our Refinisher to color this new wood, to match the rest of the bed.

Wednesday, March 16, 2011

Clues to your Antique Trunk's Age

Trunk #1
 We have 6 trunks in our shop right now, possibly a record for us.  We love working on trunks though so this is fun for us.  One of them has been completely taken apart so had I taken pictures of it, you would have just seen a plain wood  box and a pile of parts.  So I left it out this time.


Trunk #2
 With so many trunks in our shop, I thought it would be interesting to see if I could find out some history about each one.  So I have been flipping through my 'history  books' and investigating hardware and tin, end caps, etc.


Trunk #3
Trunks 1-3 are very similar, displaying the same style of design and hardware.  They are all most likely made between 1870 and 1885.  Trunk #1 and Trunk #3 have the same clasps on the front, with Trunk #2 only having a very slight variation.  Trunk #2 seems, by it's hardware to be just a little newer than the other to.  But probably only by a few years.  You can see the clasps below...
Trunk #1                     Trunk #2                    Trunk #3
While their clasps are so similar,  the handles are all completely different!


 Again, Trunk #1 and Trunk #3, while having different hardware this time, have the same style of handle, called an 'Anchor Style'.  Since the leather is gone in #3 it is hard to tell, but try and imagine the same shape of  leather as #1, fitting into that fancy hardware.  Trunk #2 has a 'Slotted Style' handle with an end cap that holds the handle onto the trunk.  Another small hint that this trunk is just a few years newer that the other two.


Trunk #4

Trunks #4 and #5 are very different than the other 3.  Trunk #4 has a metal covering over the wood.  The metal is embossed with an alligator skin print, has a curved top, and wooden slats.  The metal covering, pared with the hardware give us very good clues to when this trunk was made.  The handles are in a style called 'Plain Style w/ End Cap' which is different from any of the other trunks we have in right now.  So as to the era, we have seen pictures of trunks with this exact same hardware, and embossed metal, which were built in 1890.  So this trunk is very old, but still a bit newer then those shown above. 


Trunk #5
 Finally, Trunk #5.  This one came to us already restored, but just needing a new lock and handles.  This one looks almost new!  It was restored probably about 50 years ago and given an interesting camouflage(ish) paint job.   To try and figure out the age of a trunk, you can look at many factors, the most enlightening being  the material it was made out of,  it's shape and size,  and the hardware used.  This trunk displays hardware and styling of a trunk made between 1900 and 1925, but because of it's large size, it most likely dates during the earlier part of that era.

So tell me, have you learned anything new by reading this?   I would love to help you discover more about the treasures you have hiding away at home.  Bring them in to us! Give us a challenge!


Friday, March 11, 2011

Hand Colored Cane Woven Seat.


We have a project going on right now that we will use for customer seating in our office, once it is completed.  It is a very interesting project for us, as it allows us to express our creativity, imagination, and varied skills.

We have a set of 3 chairs circa about _____.   They have carving all over appropriate for that era.  The first of the three chairs is completed,  in a traditional (or perhaps I should say, generic) manner.  It has a beautiful hand caned woven seat, and an allover stain in ______.  It is lovely, and the customers who come into our shop often comment on it's attractive appearance. 

The second chair is the one we are featuring here.  We painted it black, and accented the carving in gold, giving it a very notable, striking appearance.  When we show it to people, they always are very excited about it, even more than chair #1.  We decided the seat needed to be equally interesting and so we are doing a colored cane.   We have died a medium width cane black and woven it in on some of the diagonals.  I think it looks pretty good.  We may decide to go with a wider width of black, to give it a more dramatic appearance, but whatever we decide, I will be sure to show you the chair, when it is all put together again.  Then I want to know what you think!!

Wednesday, March 9, 2011

Update on Unique Tambour Unit


I previously posted about this unique style of a roll top desk tambour unit.  Work is almost done and I wanted to give you an update.  In case you didn't read the earlier post, you can catch up at the link below, then get on with reading this post....
http://furniturerenewalist.blogspot.com/2011/01/tambour-unit-for-roll-top-desk.html

The gauze job ended up being very, very fussy.  If we weren't careful, some of the slats would end up to far seperated when the unit was turned over.  We didn't want that!

After the unit was all in one piece again,  we had to repair a few of the slats which were chipped.  They were small breaks near the ends of the slats, so we were able to just put in a veneer patch.  The patch then needed to be colored to match the rest of the wood.

Because of the way this tambour unit was made, it tends to be rather stiff.  To combat this stiffness, we have it settling into a curved shape on this rack we made just for this job.  We have also stained in between each slat so when the unit is in this position, you will not see a lighter section where the wood edges show.  The final work to be done on this beautiful tambour unit is to apply a water based topcoat sealer, for further protection.

Tuesday, March 1, 2011

Another Childs Seagrass Rocker!!!

 Not long ago we had a very unique child's sized seagrass rocker come into our shop, to be completely re-woven.  It took us some time, and a lot of skill, to get the job done.  It was picked up earlier in 2011 by it's very happy owner and we figured we would never one like it again.

Boy were we wrong!  We had another rocker come into our shop of an almost identical design, just weeks later.  The only noticable differences between the two, is that the first one had a rounded top, and this second one has a square top.  But they are so
similar, that they even have the same decorative diamond woven into their backs.

On a quick glance, the first one that came to us looks like it was in much worse repair.  But upon further inspection we found that this one was just as much in need of help.  There are broken fibers throughout the entire seat and back.   Many of  the  thicker sabilizing strands are broken off, and the lower front corner on one side is missing.


I am looking forward to seeing this chair new, sturdy, and ready for little bodies to sit in it!

If you would like to see what we did for the first little seagrass rocker, you can go to this link.....
http://furniturerenewalist.blogspot.com/2011/01/beautiful-childs-seagrass-rocker.html

Or this link for a full photo display....   http://www.flickr.com/photos/furniturerenewal/sets/72157625699640273/