Pages

Friday, September 30, 2011

A Little Oil and Wax Go A Long Way!

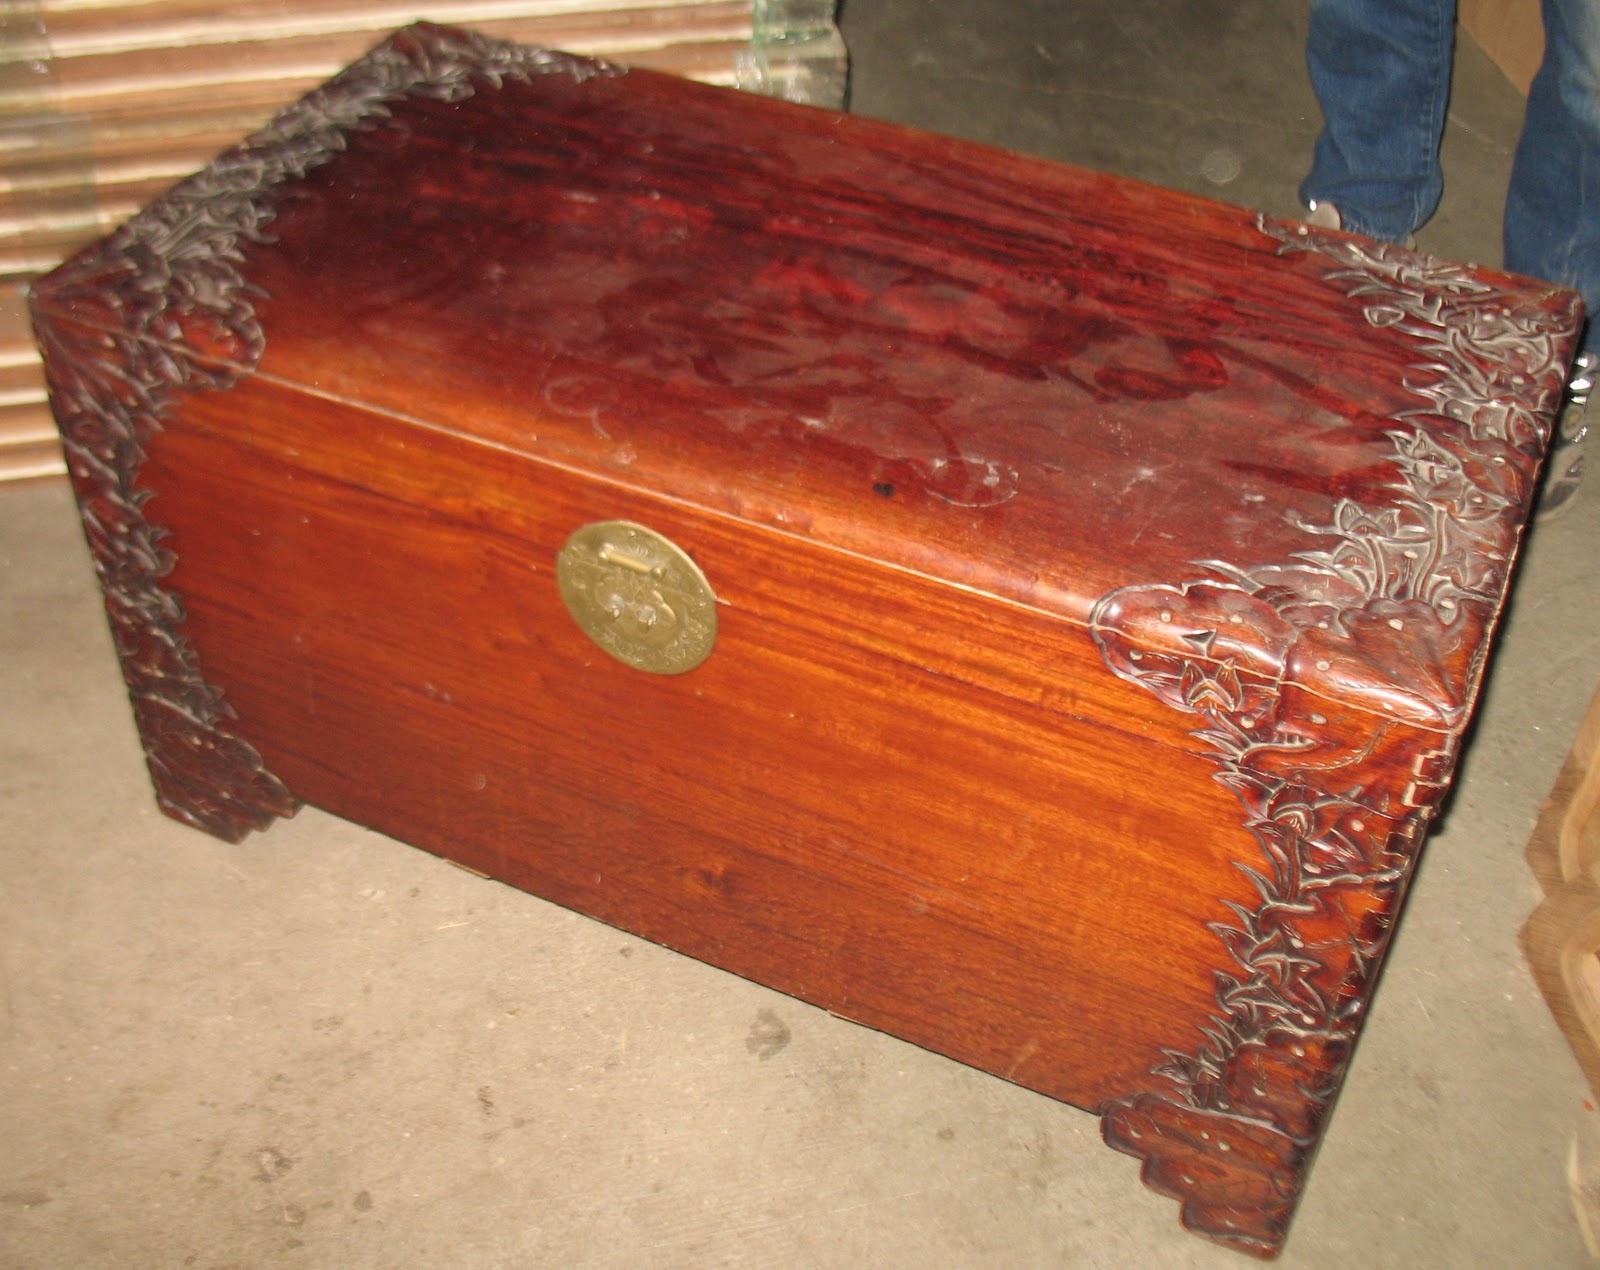
This beautiful chest just left our shop today, I am glad I got pictures of it before it went!  It came to us with just a few problems,  the first issue we had to deal with is that the top panel of the lid had shrunk.  It was the correct size side to side, but small front to back.  Because of all the intricate carving it would have been extremely expensive to add wood and carve to match.  Instead we agreed to move the panel forward so that there was no gapping on the front, and then we colored the bare lip on the back so that it blended with the rest of the lid.

Our next step was to clean and wax the entire exterior of the chest.  In had some discoloration to the wood, where patches were lighter in color then the rest,  and there was some odd whiteness in the carving.  We still don't know what caused that or if someone at some point did it on purpose.  But the Georgian Mahogany colored wax got rid of all of those color problems and gave the chest a gorgeous deep sheen.
 The interior of the chest was very dry when it came into our shop.  Not only did this do nothing for it's beautiful wood grain, but dry wood also brings a host of other problems.  When the wood is dry, it is more susceptible to cracking and breaking, as well as shrinkage. (hmmm, could this have lead to that top shrinking?)  Also, the pores are more open which means that they can catch moisture born issues and various molds.
We used two coats of Tung Oil on the interior of the chest which fixed the 'dry' problems and also brought out the gorgeous wood grain patterns.  I almost think this trunk should just be left empty so that the marble pattern on the bottom can be properly displayed and admired!  I know that will not happen so instead we can all just admire it in this picture.

Our customer was thrilled when she saw the finished result.  It is reactions like that, that make our work so satisfying.  We love a happy customer.

Thursday, September 29, 2011

Antique Veneered Chair Set

We are just beginning work on this beautiful 'his and hers' set of chairs.  This old set is made of walnut which has gained a lovely hue as it has aged.  They came in to us with two different stain colors and now that they are stripped, we can see some interesting information about the set.  

You can see in the second picture an image of the side rail of the arm chair.  The upholstery attaches to the upper section of the rail, and the lower section is exposed.  We can tell that this set was made in Europe because they implemented a practice that was never done in the United States.  While the entire chair was made of solid walnut, the rails around the chair were made with a 'cheep' wood and then covered in a walnut veneer.    They did this to save in cost, but here in the US, that was always way to much hassle.  If it had been made here, it would have been all solid wood and no extra step of veneer.

The veneer on this chair has been damaged, and part of our repair process will be to either replace the veneer or do some color touch up to make the damage blend with the rest of the piece.  Be sure to check back often as work on this beautiful set continues.

Wednesday, September 21, 2011

Climate Based Wood Shrinkage

Shrinkage is a major problem we see with furniture that comes into our shop.  We are in a somewhat dry climate in California and much of the furniture we see has come across from the more damp climate of the east coast.  Wood is made like a sponge, it holds water so that it stays at equilibrium with the humidity of the climate around it.  As wood goes from damp to dry climate, over time water leaves the wood which causes the wood to shrink.  

This shrinkage causes seats to split, dowels to come loose, and certain kinds of glue to fail.  The best way to deal with an issue of this kind, is to disassemble the item as completely as possible, clean all the old glue off and then glue the piece back together.  This way we can make sure that all the joints are tight and re-fitted for a now ever so slightly smaller piece of furniture


As you can see with this chair,  even though it may have come to us in complete disrepair, we can still make it tight, beautiful, and safe for use again.

Besides having newly tightened joints and seams, this chair also has a beautiful, safe new water based exterior.  We began with a Warm Cherry Stain, and then applied a Semi Gloss Finish over the top.  It is now ready for daily use for years and years to come.

Tuesday, September 20, 2011

Protective Gear and Sanding

All geared up and ready to start sanding!
 After my last experience sanding with a flap wheel sander, which left me completely covered with sanding dust, (which I have chronicled in this post ... Lessons In Sawdust And Sanders) I decided I needed to prepare a bit better this time.

This time I brought a bandana to keep the dust out of my hair, wore proper eye protection, and used an actual dust mask instead of a rag tied around my face.  I also had in a pair of very effective ear plugs!  It is amazing how well those things worked!    They completely blocked out all the chuckles and laughter of the 'real' workers in the shop as they watched my stumble through sanding this old trunk.

The sanding queen!
I also put on a pair of anti-vibration sanding gloves after a while, to keep my hands from suffering to much.  This experience with a non-dust collected sander was much better then the last.  I didn't get as much done as I would have liked however because my arms began to get tired from trying to control this unruly spinning sander.  Oh well,  the 120 grit sanding is almost done.   Just 4 more of the wooden straps to go and then I will treat all the wood with Oxalic Acid to get the grey out.

 After 130 years, the metal has turned the wood a bit dark, so the Oxalic Acid will help lighten it up a bit.  Once the wood has been treated, I will sand the entire thing again with 180 grit and then I get to the fun part, staining!  I have so many options with staining, I have to think about that a bit.  What would you choose?

Friday, September 16, 2011

Doggie Chew Toy Rocking chair


The doggie who lived in this house had such a good time with this rocking chair!  The pup must have have had some sore teeth because he used the wood on this chair as a chew toy!  When it was brought to us it had gnawed areas all over along with scratches over most of it's platform base.

The first step in repairing this rocking chair was to fill in all the areas where the wood was chewed away.  We did this with an epoxy putty.  This putty comes in several shades and we chose one that was the closest to the shade of the chair.  Once the putty dried it could then be sanded to blend in shape with the wood around it.

The next step was to 'camouflage' all of the chewed and scratched areas to make them disappear.  Once again, our touchup man came to the rescue. With all his brushes, spray cans, powders and pigments he was able to essentially paint in a woodgrain to match the rest of the rocker.  Looking at this rocker now, one would never know that it had been the victim of a canine dental emergency.   Take note all you puppy owners out there,  once your furry friend is done with your furniture, take it to us and we will help it to look good as new again!


 Just in case you look at this chair and are confused when I say 'rocker', this particular design is known as a 'platform rocker'.  It has a stationary base (platform)  and chair that is attached by springs which are hidden from view on the inner side of the base.   While rocking chairs themselves are at least as old as Benjamin Franklin,  platform style rockers are a bit younger, first being introduced around 1870.

A Stain to Complement an Existing Faux Finish

 We just completed work on this beautiful cedar chest.  It has a faux finish inlay section which the owner of the chest wanted to preserve, but  they also wanted to update the finish on the rest of the chest.


We masked off the inlay with a protective plastic tape and stripped the old stain off of the rest of the chest.  Once the stain was removed, we could see we also had some veneer challenges to deal with.  This chest is made of cedar with a walnut veneer over top.  The walnut veneer was peeling back on the corners, and had actually chipped away in places.  This required some repair, and some expert color touchup work.
While the faux finish section could have looked very bad if the wrong color of stain was chosen for the rest of the chest,  we were able to work with the owner of this piece to find just the right stain.   The color we ended up using for this piece is 'Dark Pine' with a 'Satin' sheen finish over it.  This combination beautifully highlights the faux finish section while also making the walnut veneer glow.  Yet another pice of furniture we can hand back to it's owner knowing it was a job well done!

Monday, September 12, 2011

Classic Hitchcock Chairs get a Touchup

These beautiful  'Hitchcock' style chairs have received much loving use over the years.  As a result the black paint on the arm and top rails has worn off from handling, and there are 'table rub' marks on the spindles of the side chairs.  To repair these chairs, we went to our color touchup man with the magic fingers.  All the worn areas needed some delicate sanding with very fine grit paper to finesse the contours and make sure the new color could easily blend with the old.  They then received new color to the worn areas and a clear top coat.


The chairs now look good as new.  You would  never know that they had been worn looking.  Our guy in the shop did a great job.

Hitchcock chairs have been around for quite some time and they are still very similar to what they looked like originally.  In 1818 Lambert Hitchcock started the Hitchcock Chair Company, his vision was to create beautiful affordable mass produced chairs.  They also used a relatively new idea,  instead of hand painting a design on the back of each chair,  he used the easier technique of stenciling.  This stenciling gives the Hitchcock chair a unique and very distinguishable look.  By 1820 his company was producing over 15,000 chairs a year!  

While the Hitchcock Chair Company has changed hands a few times,  the company is still in existence and are still making this beautiful classic design.  

Wednesday, September 7, 2011

Bad Joints #2

For my second 'bad joints' installment, I want to tell you about this sad drawer.   The face of this drawer came right off of the box,  leaving the drawer quite useless.  Now, why would this happen?  Shouldn't a good joint stick together a bit better then that?  Absolutely.  Unfortunately there are so many drawers out there which are just one tough tug away from falling apart.  So before you go out and remodel your kitchen, or buy a new dresser, let me help you narrow down your search for a good drawer.

The problem with the drawer in the first photo, is simply that a 'but joint' was used.  A 'but joint' pretty much means that two flat pieces of wood were stuck up next to each other and glued together.  In the case of this drawer, nails were also used to re-enforce the area.   In my last post I told you how much better it is to have two flat pieces glued together than having flat piece glued to a contoured piece.  That is still true, but in the case of a drawer, which is constantly being pulled on,  extra measures should be taken to ensure the joint does not come apart.

Dove Tail Joint
So now, a few examples of a drawer joint, done right!   My first example is of a 'dovetail joint'.  This is the most commonly used (good) 'right angle' joint used today.  The benefits are that a well made dovetail interlocks giving extra stability to the joint. Also, the way they are designed, as you pull the drawer face out,  the dove tails bring the sides of the drawer out with it.  A disadvantage to this design is that as the wood shrinks with age, or dry weather, the wood can begin to separate and can eventually come apart.   We do get this kind of joint in for repair from time to time.


Pin and Cove Joint
Not so common, but an even better joint than the dovetail,  is the 'pin and cove joint',  also called the 'pinned joint'.   We rarely see this method used in modern furniture.  It was an American invention,  but it never caught on in Europe which ultimately lead to it's discontinued use.  It is however much superior to a dovetail joint.  We have never once had to repair a failed joint, when it is made in this method.  We have had plenty of drawers come in for other sorts of repairs, but with perfectly tight, in tact pinned joints.  In the photo to the right, you can see how this joint is made.  We took this drawer apart so that we could repair the drawer runners, and it gave us a perfect opportunity to photograph the 'workings' of a Pin & Cove.  The best things about this joint are,  #1  It is actually a little faster to make than the dove tail,  #2 There end up being more points of contact for the glue to adhere to because one drawer can accommodate many more 'pins' than 'tails',  #3 As the wood shrinks the joint actually tightens onto itself.  This is probably the single greatest reason why this joint holds up so well.

So if you are out shopping for a new bureau or kitchen cabinetry,  check out the corners of those drawers.  You at least want to see a dovetail pattern, but if you see a pin and cove pattern, snatch that find up!  You not only have a rare piece of American craftsmanship,  but you have a piece of furniture which will stay together for a very long time!

Friday, September 2, 2011

Bad Joints #1


The chair to the left is sitting in our shop right now, obviously in need of a bit of repair.  When I took a look at this un-done joint,  I was amazed at the horribly bad engineering.  No wonder the arm came loose from the seat of this chair.  When I saw this joint, I realized, some poor person had purchased this chair set, having no idea that they were making a sad decision.  So I thought for your educational benefit,  I would help you avoid such pitfalls when next you decide you need a new dining set.


The first thing that I notice about this joint is that someone tried to use a tiny little swirl of glue to adhere a flat surface to a ridged surface.  The problem with this, is that only on the few areas where the ridges meet the flat, will the glue be any good.  And the glue was only used in a little swirl which makes it even worse.  Perhaps had the glue actually been applied to the entire flat surface,  the joint would have lasted longer.  But ultimately you can not expect glue to hold together a flat surface to a ridged one.  They tried to supplement the glue by using a bolt, screwing from the inside underneath of the seat out into the arm.  But once the glue failed,  all the stress was on the bolt.  The arm would have immediately become wiggly.  And all that wiggling would eventually have caused the the stiff bold to break down the pliable wood, which would eventually then have broken. 

So,  when looking at chairs,  if you see an attractive contoured base to the seat,  take a close look and see if there is any gapping between the seat and the arm.

Now just for contrast I want to show you this chair which is over 200 years old.  Yes, it is in our shop for repair,  but this chair lasted 200 years before breaking,  instead of the handful that the first chair lasted.  You can see from the upper image of the chair that it is the same sort of issue,  an arm, which has come detached from the seat. But upon looking at the lower image, we can see why it lasted for so long.  First off,  there are two flat surfaces which are being glued together.  and in addition,  the arm is cut into the seat a little bit which gives more area for the glue to bind.   The second thing I want you to notice is that instead of using a bolt to give added support to the glue,  two wooden dowels connect the pieces.  The grain on the dowels runs across the joint (rather than with it).  This cross grain makes the joint very difficult to break.  

Remember this about wood vs metal.  If wood and metal ever get into a disagreement,  the metal will always win.   The ax chops the wood, not the other way around.  So if you have a joint which is partially enforced by metal,  if the glue ever fails,  then the metal piece will wear down the wood over time, and your repair will be even tougher.

I always recommend, when you are looking to fill out your furniture repertoire, buy old!  You will get a much better quality of wood, glue, joints, finish, etc.    You may need to do a little fixing up,  but once that fixing up is done,  it should last you a very, very long time.