Pages

Tuesday, November 27, 2012

A Refurbished Ladies Chair


This intricate crest belongs to a dainty little ladies chair. It is so small that by our standards we would think of it as a youth's chair.  But then people are a lot bigger now then they used to be!  Now it is just the right size for an occasional bedroom chair  or for sitting in when you are putting your shoes on.  

The chair came to us with broken cane on the back.  Enough was broken that we really couldn't repair it, we needed to completely replace it.  It was woven with a 'blind cane' method, so the holes that the cane goes into don't go all the way through to the back.  This is much more challenging then regular hand cane.  Once the cane work was done, the 'blonde' looking natural cane needed to be colored to better blend in with the chair.

We also refurbished the chair.  This means that we refreshed the existing finish rather then applying a new one.  Depending on the method used, refurbishing isn't always a job that requires high levels of skill, but it does require high levels of labor.  For this chair we chose a wax color that would fill in where the old finish color had worn off.  This wax is applied by hand, left to dry, and then polished by hand.  This polishing process is quite labor intensive and not for the weak of elbow.  And in addition, this chair has so many little nooks and crannies that the polishing task was bumped up several notches in difficulty.  No one wants a glob of wax stuck in one of those pretty carved leaves!


Friday, November 23, 2012

Fixing Water Damage on Furniture

The holidays can be so damaging to our lovely table tops!  A water cup gets left on the table to long and creates a ring.  A table decoration gets over watered and creates a bigger ring.  A hot serving dish gets put down without a trivet and leaves a big white square.    What do you do?  Do you replace your table?  Do you try and hide it from now on with a table cloth?  No, and no!   White water damage marks on your table can be repaired.  I can give you some tips to try at home, or you can bring it to us and we can do the work for you (you have better things to do,  like drinking eggnog and shopping and skiing!)
The 'do it at home' method is going to take quite a bit of elbow grease.   You will also need a piece of soft cotton, like an old T shirt.  Thirdly you will want to purchase some Liberon 'Ring Remover'.  We sell it here at our shop, or you can get it online.   Take your piece of cotton and make it into a ball that is smooth on one side.  One side will be your handle, the other (smooth side) will be your work surface.  Apply the ring remover to the 'work surface' side of your cotton ball.  Smack it with your hand a few times to spread the product through  the cotton and then start rubbing your water ring.  You want to rub the wet cotton forcefully cross the water mark in the same direction as the wood grain.  This process will take some time, and quite a bit of pressure, but the ring will disappear if you are patient.  Remember, I said the 'do it at home' method is going to take elbow grease!  The heat caused by the friction works with the chemicals in the ring remover to pull the moisture up out of the wood.  Once you are done, the ring will have disappeared.  If you have a shinny spot afterwards,  you can either rub the rest of the table or a coat of wax will even the finish back out.  Just don't do both projects on the same day!  You might not be able to move your arm for a bit and those gifts won't wrap themselves!

If all of this work just makes you want to run and hide behind your pile of yet-to-be-wrapped presents, then bring your project to us!  We have many different ways of dealing with damaged finishes and will find the perfect solution for your waterlogged problem.


Wednesday, November 14, 2012

Woven Basket/Box Modification

 This is one instance where certain pets did not get along with the furniture they were living with.   The pet certainly won this fight!

The material on this  box was actually woven in a big sheet and then wrapped onto the box.  There is braid holding down it's edges and seam. It is almost impossible to find this kind of woven 'cloth' and to re-weave the damaged areas on this
box by hand would have been very tricky

So instead our client went for a more creative route.   Instead of repairing the woven fibers, we covered them with some custom made medallions.   While we were cutting, we also made a much nicer lid.   Our client does her own 'faux painting' so she is going to add all the finishing touches to this project.   We think this box came out looking very cute!  Hopefully we can convince our client to take some photos for us, once her painting project is done.

Monday, November 12, 2012

Re-Weaving a Wicker Hamper


This wicker hamper was shipped to us from out of town.  We have gotten several out of the area clients lately who think so highly of our work that they are willing to pay the postage.  This vote of confidence makes us very happy!  

What makes us sad is that someone used this lovely hamper as a stepping stool.  Just so you all know, you should never, ever use your woven furniture for standing on.  It is very sturdy stuff, but doesn't like shoes.  We once had a chair come in that actually had a high heel shaped hole in the seat!  Oops!

Fortunately we can re-weave broken items like this.  We had to straighten out the metal shelf support and then weave a brand new shelf.  As you can see, there were also lots of little broken strands on the hamper and on the decorative 'back splash'.   With little breaks like this we just weave in a new strand, rather that re-weave the entire basket.    The new fibers come in a pale 'natural' shade.  Since the entire hamper is not being re-woven we will need to make a custom stain color and use it to touchup the repaired areas.  

Monday, November 5, 2012

Chair for Upholstery

Before, During, After
It can be difficult to see just how beautiful the 'before and after' photos are, when a chair is missing it's upholstery.  But let's give it a try.   This lovely old 'shield back' chair came to us after the upholsterer had stripped it down to the frame.  This step is important because we can not work with the chair if there are still shards of padding hanging on.  We need to be able to access the wood without any hinderance.    Once the upholstery is stripped off and the chair is brought to us, we strip of the finish with our water based stripper.  It goes through three different liquid processes to get that wood sparkly clean.  
After this, any repairs can be done.  It is important to get those repairs done while there is no cloth on the chair.  With the cloth on, the joints become covered and impossible to reach.  After the repairs it is time to prep sand the chair and apply the stain and finish.  For this chair, our client chose an English Oak stain with a Dark Pine toner.   This color combination is going to look very nice with the golden blond colored upholstery she has chosen.  Now that our work is completed,  it goes back to the Upholsterer for the final step.


Friday, November 2, 2012

Oak Mission Style Desk

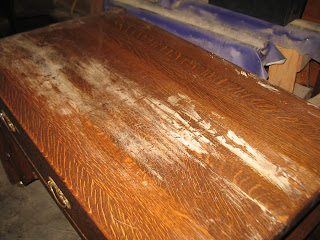
This beautiful oak mission style desk came to us for restoration and water damage removal.  As you can see from the photo below, the top surface has a significant amount of water damage.  The white haze appears when moisture penetrates  the
finish but does not get all the way down to the wood.  We started out by using a 'no blush' product which can sometimes fix this problem with just the spritz from a can.  We then sprayed the entire desk with a 'dark pine' water based stain.  This really helped freshen up the overall apearance of the desk.
We also applied a 'retarder' product which eliminated the remaining moisture damage.  Over the retarder we gave the desk two new layers of finish in a lovely 'satin' sheen.  As you can see, the desk looks much better.
 It has a new brighter appearance and the moisture damage is almost completely gone.  This process doesn't always work to remove water damage. Sometimes more labor intensive approaches need to be taken and sometimes the whole piece actually has to be stripped and refinished.  But in this case, we are very happy with the result of our method!