Pages

Showing posts with label woodwork. Show all posts

Monday, December 17, 2012

Reconfiguring a Newel Post

A longtime customer of ours brought this old Newel Post in to us for stripping and some modification.   In it's original location the stair rail wrapped around it in such a way that there were three places where the wood had to be cut to fit the rail.    

 In it's new home in our customer's house these cutouts in the wood would be very odd.  The post was also about 3 inches to tall.    Once the piece was stripped we cut three inches off the bottom of the post and saved this wood for the repairs on the top of the post.  
Using the wood we saved from the base, we filled the three voids on the top of the post.  This ensured that all the woods would match.  We wouldn't have new wood mixing with old wood.


These areas would have to go on the lathe to be shaped so we actually cut a portion of the decorative top off.  We had to be strategic about where we made this cut, so that it wasn't visible to the general viewer.  This means we needed to make the cut under one of the turned curves.
The Newel Post repairs turned out very well.  It will be much more functional in it's new space and could really be a centerpiece bit of architectural woodwork.

Thursday, January 5, 2012

Training an Apprentice

 We've got a new man at the shop!  While he is not quite a full-fledged 'craftsman' yet,  he is beginning to learn the tricks of the trade.  For his first day as an apprentice craftsman, he is working on the Lathe,  learning how to create replacement spindles for a Hall Tree.  In the forefront of the first picture you can actually see one of the existing spindles still stuck into the Hall Tree.  Our apprentice will need to successfully create two more spindles, to replace a few missing ones.  He starts out by cutting several pieces of practice wood to the correct length.  The exact centers must be found, and then a hole drilled into that spot.

Each block is put onto the lathe and smoothed into a cylindrical shape using a large, shallow carving knife.  Then, each of the curves from the existing spindle is measured with calipers and the measurements are then marked on the new spindle.  Using these markings, our apprentice then learned how to use various carving knives to contour the spindle.  Calipers were used each step of the way, to make sure the new spindle is exactly the same size as the old.

This is very tricky work for someone who doesn't have a whole lot of experience.  After watching the process the first time, he was able to complete a few spindles on his own, which is pretty impressive.  With each spindle, he got closer and closer to the desired effect and is just about ready to move on to the 'real' thing, which will be carved out of Redwood to match the rest of the Hall Tree.  Learning to work with wood in this fashion is a pretty unique thing in our modern world.  Other then high school woodshop class, there aren't a lot of opportunities for a person to learn this trade from an expert.  That is why it is so exciting for us to be able to take on and train an apprentice.  It means that the skills required to turn broken furniture into beautiful, functional furniture, will last into the next generation.

Monday, July 25, 2011

Custom Cut Dowels


I just wanted to show you one more way that craftsmen here at our shop go above and beyond to do the best repair work they possibly can.  We are currently working on repairing an antique settee which had to be completely taken apart, then put back together.  Each of these joints had dowels holding it together.  Now most shops will to one of two things, they will either re-use the old, often worn out dowel, or use a standard, pre-cut,  2" dowel for all the holes, just like those in the first image. Now these may seem to you like perfectly reasonable ways fix a loose or broken joint, so let me explain to you why we like to do things a little differently.

First off, we like to use a maple dowel which is much harder and therefore much stronger than a standard pre-cut dowel which can be made out of any number of woods. When you are not sure what wood the dowel is made out of, it is tough to know how strong it will be.  Using a maple dowel is going to allow the dowel to withstand much more abuse without breaking.


We also measure each dowel opening on the piece we are repairing and then custom cut the dowels to fill the maximum amount of that opening.  This way we do not end up with hollow areas in the joint, which is the biggest problem with pre-cut dowels.  As you can see in the photo above, we have cut dowels into all different lengths, some quite a bit longer than others.  Imagine if holes which go with those longer dowel pieces were filled with a standard shorter 2" dowel instead.  There would be gaps in the wood which would cause the entire joint to be weaker.

Custom measuring and cutting dowels is definitely an extra step which can bee seen as a bit of a hassle.  But the extra work is so worth it when you consider the structural strength that is gained with a perfectly fitted dowel.  

Wednesday, June 15, 2011

Stained Cedar Chest, Looking Good!!!

 I am so excited to show you this 'before and after' set of photos.  I wrote a post recently showing you all what this wood looked like after the paint was removed,  and it was pretty beautiful.  Now that this cedar chest has it's finish work done, it is a piece that is worthy of being the highlight of the room.
The chest received a water based 'medium cherry' stain which really brought out the beauty of the Cedar.  Over that we applied a water based satin finish.  The inside of this cedar chest was left unfinished so that the the aroma can still be enjoyed.  Growing up, I always wanted a cedar chest of my own (my mother had a beautiful hand made one with her name carved on the front).  I still don't have a cedar chest, but if I did, I would want it to look just like this!

 What do you think of this transformation?  Do you have a treasure of your own that is just crying for some TLC?  Bring it to us, we would love to bring it back to life.

Tuesday, June 14, 2011

Peeling Veneer on Intricate Marquetry

 Boy do we have work to do on this table!   It holds the unique distinction of being a hand made table,  crafted by the brother of it's current owner.  The marquetry on the top is not an easy thing to do, by any means.   It is done with several different varieties of veneer intricately cut and put together in a star pattern.  Some of the veneer was flaking off when it was brought to us for repair and restoration.

Our task is to strip the old finish off,  do any repairs to the veneer needed, and then re-finish it.  We knew it was going to be a big project, but we didn't get to see just how big, until that old finish came off.

It has been put through our stripping tanks, and we now see the true state of the veneer marquetry. The veneer is peeling off badly all over the table.  Some of the veneer pieces are missing completely.  This means a lot of delicate glue work, and quite a bit of very careful, exacting  veneer cutting.  It is like trying to make a piece for a puzzle when one has been lost.  Can you imagine how hard that would be?  Fortunately, we have very skilled craftsmen here at our shop, but I do not envy them the job of fixing this table.  I will put more pictures up as the work progresses on this pice!  Do you have something with peeling veneer? Maybe a 30's era bedroom set, or a dining table that someone was not kind to?  Bring it to us, you will be amazed at what we can do!

Monday, June 13, 2011

A Choice Between Two Finishes

One of the best things about having a furniture restoration business is the artistry and creativity that is involved.  These two doors belong to a TV cabinet that is being re-vamped. The owners of  this cabinet wanted something unique, not just paint, not just stain.  The plan they came up with, which we are happy to implement for them, is to use both paint and stain!

We started out by finishing this cabinet in a deep red color, which is very similar to the color it was prior to stripping.  Our customers then brought us a custom made paint they had created to match some items already in their house.  We then applied the paint to their doors in two different methods so that they could decide which  better appealed to their sense of style.  The top door is done with a 'Glaze', the bottom door is done with a 'Wash'.

Which one do you like better?

Thursday, June 2, 2011

30's Art Deco Table With A New Stain

 This lovely waterfall style 'Art Deco' table came in looking pretty, but went out looking beautiful!  When it came to us, the center leg had fallen off and needed repair so that it would be useful again. So we stripped the golden hue finish off of the table, and repaired the leg.  Then we applied a Jacobean stain to the legs and table top, and as an interesting accent we applied a Natural stain to the banding around the bottom of the table top,  the corner caps and the accent 'wing' pieces.   The entire table then got a 'gloss' finish which made the wood look wet.   It came out so beautiful.  I really love the new stain choice our customer decided on.  I think it gives a more modern sophisticated look than the old gold hue.
As you can see, the color combination we used really made the corner details stand out.  Before, the corners were pretty but not particularly noticeable.  Now with that dark color on the corner cap and wing details they are a beautiful interesting feature.  To me, it looks like a bird, with the dark head and wings.

Wednesday, May 25, 2011

Fabricated Table Leaf for a Fancy Table Top


This beautiful table left our shop yesterday, after having finished it's time under our care.  Among other things, it needed a new leaf made so that it could stretch out and accommodate more people.  The table has a fancy veneered top featuring panels that radiate out from the center, and a border all around the outside.  It would have been rather costly for the owner of this table, had we attempted to do some kind of fancy marquetry to match the rest of the table.  Fortunately the table had a section right down the middle with consistent horizontal grain.  We used the same kind of veneer for the leaf and matched the horizontal grain pattern.  The leaf also needed to have 'skirts' made on the edges.

Once the leaf was fabricate we finished the entire table in a water based Brown Cherry stain with a water based Satin finish.  The table also got a 'pore fill' treatment which made the top perfectly smooth. This treatment is quite a bit of extra work and our Finisher did a great job at it.  We are so happy to see this table and it's matching hutch leave our shop with it's happy owner!

Tuesday, May 24, 2011

Child Sized Rolltop Desk with a Chalkboard!

This adorable child sized roll top desk just got it's repairs completed today.   I wish I had thought to take a picture before it was repaired!  But I can at least recount for you what we did to get it in it's current cute shape.  You can probably see a pale line across the top, that is where the wood was broken in two.  We could have done color work to make that line  disappear, but the owner's of this desk decided not to have us do it.  We also repaired the tambour unit,  made the chalkboard writing surface be able to slide in and out,  repaired the falling apart cubbies and put the stand back together.

This is such a cute desk.  I envy the child who gets to spend their hours playing school at such a neat little workspace.

Friday, May 20, 2011

Taking a Headboard Down a Size

From time to time, we have been asked to take a Full sized bed and make it into a Queen sized bed.   I actually have one of  those projects posted here on our blog.  But this time, someone brought us a Queen sized bed and want us to make it into the smaller Full sized bed.  This is a new little challenge for us to take on.  Instead of adding to the headboard we are taking away,  so we needed to find a way to do this, while still preserving the original design.

To do this, we removed the curved top section and we removed the decorated side pieces that extend down into the legs.  We then cut the center section down the needed size, moved the trim, and re-attached the decorated side pieces.

We cut the curved top section to retain the same size it had when it was larger, and then re-attached it to the rest of the headboard.  We still need to color match the raw wood areas,  and do some masking touchup to the front where we had to move the trim.  I think it is going to look pretty good when it is done!

Tuesday, May 17, 2011

Overcoming the Power of an Old Berry Stain

We have a few pieces in, from different customers, which offer us a unique challenge.  These pieces came in to be stripped of their old finish, and have a new finish applied.  All of  these items went through the stripping process, after which we discovered that part of the original staining work would linger.  You see, these pieces were colored with a dye, that could not be removed in stripping.

This dye is a Berry based stain and penetrates the wood fibers to permanently color them, as opposed to a pigment color, which we would use, that sits on top of the wood.  You can find this dye used in old furniture as well as modern, so we never know when it will pop up.

 Sometimes this kind of dye is used on a lighter colored wood, such as Poplar to make it match, say a Mahogany wood, then a pigment stain can be applied over both, and it will look like they are the same kind of wood.

In the case of this Piano Stool, we were able to remove some of the color during the prep sanding process, which left the red in the crevices.  Instead of letting this be a problem, we used the red as a natural 'highlighting', to give the stool some extra character.  Then we used a medium Cherry dye which helped to even the color out without making the stool to dark.  Of course the stool has our super earth friendly Water Based Finish over all of that!

How do you think the stool looks?  Have you ever had to deal with a dye stain like this?  If so, what did you end up doing with the new  finish?  We would love to hear, in the comments below.

Monday, May 16, 2011

Completed Work on Headboard Extension

A while back I was telling you all about a project we were working on, then I completely forgot to show you the final product!  Well here it is, a beautiful bedroom set which we refinished.  But the biggest part of this project was the bed.  It started out as a Full sized bed, and we turned it into a Queen sized bed.  Can you see from this picture what we did?


In case you can't figure it out, you can check it out in these older posts...  
http://furniturerenewalist.blogspot.com/2011/02/update-on-full-to-queen-bed-project.html

http://furniturerenewalist.blogspot.com/2011/02/bed-extensions-making-full-into-queen.html

Now that the set is done,  I think it looks very good.  You can hardly tell that one of the dressers is not actually from the set! What do you think of the work?  Do you like the design for the headboard and footboard extensions?

Friday, May 6, 2011

Progress On Our Latest Faux Finish Project

Our latest Faux Finish project is coming along very well.  As with all of these projects, there is a point where I look at the piece and go, 'Um.....really? How is that going to look not weird?'  But then the work progresses and I start seeing the vision of our Faux Finish Visionaire start to come come alive.

We began by mixing our own custom creamy yellow base color, which we applied to the side panels on this cabinet, and to the frame sections on it's doors.  We also applied this color to 4 sections of a coffee table that is going to co-ordinate.  After applying the base,  The doors and the coffee table also received a coating in select areas of a Bayberry green color which you can see very well in the doors above.   The side panels have had a Red Pepper color rubbed into the cracks and crevices, followed by a Van Dyke glaze.  It looks very cool.  The coffee table and doors also have had a Van Dyke glaze overall, which give them such a neat aged look.

I have gotten past the 'that looks weird' stage, to the 'wow, that looks cool' stage and am looking forward to seeing these completed!  What do you think of these color effects?

Friday, April 22, 2011

Eiffel Tower Table

One of our employees playfully called this the 'Eiffel Tower Table',  which seems a fitting name for it.  It has very delicate, intricate legs and arches which easily remind one of the building in Paris.  And while the construction of the building is certainly sound,  the construction of this table isn't quite as sturdy.  The entire base of this table is made of cut outs which give it a unique 'world traveled' sort of feel, but are unfortunately rather flimsy.  There are quite a number of pieces missing throughout the table but it would have been more work that the customer was ready for us to do, to repair them all.  So instead we stuck with the most important repair, that of fixing the broken leg.  We repaired this table leg with epoxy, so it should never come apart again!

Friday, April 15, 2011

Making Buggy Wheel Spokes


 We were given an interesting little job recently.  Well, perhaps I shouldn't say 'little' as the work was not little,  although the finished product is quite small.  A customer of ours brought in the wooden wheel spokes that you see in the image above.  He had  hired someone to make these for him.  Unfortunately they just weren't shaped right so he came to us to see what could be done.

We started over shaping new spokes for the adorable buggy wheels you see in the image below.  The wheels look great and the new wooden spokes fit perfectly.  While this does not fit into our usual 'furniture' category,  we truly do enjoy working on interesting projects such as this.

Tuesday, April 5, 2011

An 1870's Steamer Trunk comes out clean

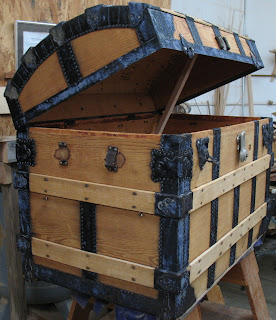
 I have blogged about this trunk previously, to talk about it's age and such, but we just did some work on it and I am pretty impressed.    The owner of this trunk already had a good thing going, because there really isn't much structurally that needs to be repaired.  The leather handles and pull are shot and the locking mechanism is damaged.  The leather that once covered the outside was removed and we still need to make a new lid-stay to keep the lid up.
But the biggest thing that this trunk needed was a cosmetic face lift, which we made major steps to accomplishing recently.  After the old leather covering was pulled off we put the trunk through our cleaning tanks.  Not the stripping tanks mind you,  just the two cleaning tanks.  The wood came out so clean that all of us here at the shop have marveled at it,  it almost looks like new wood!   We have also treated it with 'Rust-Stop' which gives the metal a bluish-black look.  I like the look, but it is up to the customer to decide the final treatment of the metal, and of course the rest of the trunk.


Do you have an old trunk hiding away somewhere?  Bring it to us!  Let us make it beautiful for you again.

Wednesday, March 23, 2011

Broken Chair Magic Act!

We get all kinds of breaks to fix here at the shop, and we do a great job of repairing them.  Our fixes are solid, clean, and last a long time.  This chair had it's top corner broken off and you can see the repair we did in the top picture.  The problem with repairs, is that they never go back together in such a way that they become invisible. The glue takes up some space, and there are often minuscule voids on the edge of the broken wood section.  So it is up to the customer to decide if it is enough just to repair the damage, or if they also want us to perform touch up work, to make the area less visible.  The owner of this chair, decided that they wanted to pay the extra cost, and have us do a little chair magic.
You can see in the second picture that we sanded the area smooth to eliminate the small bumps that the broken sections made. We were then left with a small area right on the top and most visible part of the chair, that not only had two 'fault lines' but was  missing color!  Fortunately we have a master in this kind of touch up work.  He not only blended the fill color perfectly, but he made those cracks almost invisible.      Believe it or not, that third picture is of the chair after we did the color touch up!  Pretty good right? Would you guess that the chair had been broken?  Now I do have to tell you, that if you were the one who had brought this chair in,  you would still be able to look closely and find the damage, because you know where to look.  But for any guest of yours, who sat in this chair, they would have no idea it had ever been into our shop.  And that is a job well done!
Wednesday, March 9, 2011

Update on Unique Tambour Unit


I previously posted about this unique style of a roll top desk tambour unit.  Work is almost done and I wanted to give you an update.  In case you didn't read the earlier post, you can catch up at the link below, then get on with reading this post....
http://furniturerenewalist.blogspot.com/2011/01/tambour-unit-for-roll-top-desk.html

The gauze job ended up being very, very fussy.  If we weren't careful, some of the slats would end up to far seperated when the unit was turned over.  We didn't want that!

After the unit was all in one piece again,  we had to repair a few of the slats which were chipped.  They were small breaks near the ends of the slats, so we were able to just put in a veneer patch.  The patch then needed to be colored to match the rest of the wood.

Because of the way this tambour unit was made, it tends to be rather stiff.  To combat this stiffness, we have it settling into a curved shape on this rack we made just for this job.  We have also stained in between each slat so when the unit is in this position, you will not see a lighter section where the wood edges show.  The final work to be done on this beautiful tambour unit is to apply a water based topcoat sealer, for further protection.

Thursday, February 24, 2011

The Ambidextrous Bentley Dashboard

 I suppose this dashboard isn't truly ambidextrous.  But it is being switched from a right side drive, to a left side drive, which I think is just as neat of a trick.  When our customer purchased this vehicle, it was being driven in Great Britain, where everyone drives on the wrong side of  the road.   To make life simpler for himself, he decided to have the entire vehicle flip-flopped.  
 Our part in this task was to work on the dashboard.  In the first picture, you can see the dash as we were just starting the job. (I apologize for the dash being upside down!). To do the task,  we flipped the wood over and altered the shape of the glovebox and instrument panel openings so that they worked the other way.
The on the backside of the center opening there was a routed out section which you can see in the top photo.  We filled this with bondo, and routed out a new section on the oposite side.  After staining the newly adjusted dash, we hand painted a black 'pinstripe' around each opening, as you can see in the second photo.  

This project took lots of very careful work but is almost done.  The new finish looks beautiful.  We are going to sand the finish with a very high grit paper to make the wood pores disappear.  Then it will get a topcoat of our water based finish, and this dashboard will be ready to be put in use again.  This time on the right side of the road!

Monday, February 21, 2011

The Runaway Arm Chair

 Imagine the horrible feeling you would get from watching through your rear view mirror as your dining room ArmChair tumbles out the back of your truck, does a few somersaults down the road and then comes to a stop with the arm broken off, the joints loosened and a considerable amount of road rash decorating it's edges.  That is exactly what the owner of this chair went through not to long ago.

Fortunately for him, found our shop and brought the chair in for repair.
"Road Rash" like this was visible along the edges of the entire chair.

With each joint we took apart to re-glue, we found more that were loose.  So almost the entire base of the chair was re-glued.  The broken arm was repaired and the extensive damage to the finish was fixed.  To do this, we filled all the recesses with an epoxy filler,  sanded all the abrasions smooth and then colored it to blend.  We had to do the color work by hand because the wood grain had to be painted in, and any distressing present in the original finish work had to be replicated.

The chair came out very well.  The chair's owner came and picked it up today as was delighted with it's fresh appearance.  We love having happy customers walk out our doors!