This chest of drawers came to us years ago so that we could strip it. The customer wanted to do the finish work on it, so it left our shop clean and ready for sanding, and staining. After realizing recently that they just weren't getting to the project, they brought it back to us to complete the work we started.
First off, there were some repairs that needed to be done, new drawer bottoms to be cut, a few areas patched where the wood was missing, and the top needed some bleaching. There were also some gouges that needed to be steamed out.
Then the fun began, color time! The customer came in and we put a few different stain color samples on the wood. We like to do this so that they get a really good idea of what their piece will look like when it is completed. Stains can look different on different woods, so looking at a chart on the wall isn't very helpful, it is better to see the stain on the actual wood it will be on. She chose a beautiful Cognac stain with a Satin sheen finish. The piece has new hardware and looks beautiful now that the work is done. One of the things I really love about this piece is that it's owners decided to leave some of it's imperfections visible. There are scratches visible under the finish, some spots where the wood has darkened, and an old burn mark about the size of a dime on one of the top corners. The work we did made it beautiful again, but without removing it's visible history.
Showing posts with label finishing. Show all posts
Thursday, October 27, 2011
Wednesday, July 6, 2011
Beautiful Table, With A Special Stain
As you can see, the color now is just beautiful. We used a stain that you just can't get anywhere other than here, that is because it is supposed to be a 'walnut' stain but when the manufacturer mixed up our batch, he left one of the colors out, so we call it 'Mistake Walnut'. It is a great color and we think the manufacturer should start offering it as part of their regular line up!
On top of this water based stain, we applied our water based finish in a 'satin' sheen. This is actually the most popular sheen among our customers. And reasonably so, it gives a bit of shine, but not to much maintenance. And whether you choose Mat finish or High Gloss finish, eventually, maybe 10 years down the road, they all end up Satin anyway. All the rubbing and polishing, and subtle scratching brings a Mat finish up and a High Gloss finish down.
What do you think of our 'Mistake Walnut' stain? Do you like the color or do you think that mistakes are mistakes for a reason and we should have send the product back?
Tuesday, June 28, 2011
70's Era Coffee Table Gets an Update
The gentleman likes the red look in wood so we capitalized on that. The actual wood itself is rather light when raw, so that gave us a 'bright' undertone to work with. We began by applying a Mahogany water based stain, we then applied a Mahogany toner, a Brown Cherry toner, then an Ebony toner. Over all of that a Satin finish completed the appearance you see here. The couple in so happy with it that they are having a TV cabinet done to match.
What do you think? Do you like the new color? What shade would you have chosen?
Wednesday, June 15, 2011
Stained Cedar Chest, Looking Good!!!
I am so excited to show you this 'before and after' set of photos. I wrote a post recently showing you all what this wood looked like after the paint was removed, and it was pretty beautiful. Now that this cedar chest has it's finish work done, it is a piece that is worthy of being the highlight of the room.
The chest received a water based 'medium cherry' stain which really brought out the beauty of the Cedar. Over that we applied a water based satin finish. The inside of this cedar chest was left unfinished so that the the aroma can still be enjoyed. Growing up, I always wanted a cedar chest of my own (my mother had a beautiful hand made one with her name carved on the front). I still don't have a cedar chest, but if I did, I would want it to look just like this!
Monday, June 13, 2011
A Choice Between Two Finishes
One of the best things about having a furniture restoration business is the artistry and creativity that is involved. These two doors belong to a TV cabinet that is being re-vamped. The owners of this cabinet wanted something unique, not just paint, not just stain. The plan they came up with, which we are happy to implement for them, is to use both paint and stain!
We started out by finishing this cabinet in a deep red color, which is very similar to the color it was prior to stripping. Our customers then brought us a custom made paint they had created to match some items already in their house. We then applied the paint to their doors in two different methods so that they could decide which better appealed to their sense of style. The top door is done with a 'Glaze', the bottom door is done with a 'Wash'.
Which one do you like better?
We started out by finishing this cabinet in a deep red color, which is very similar to the color it was prior to stripping. Our customers then brought us a custom made paint they had created to match some items already in their house. We then applied the paint to their doors in two different methods so that they could decide which better appealed to their sense of style. The top door is done with a 'Glaze', the bottom door is done with a 'Wash'.
Which one do you like better?
Thursday, June 2, 2011
30's Art Deco Table With A New Stain
This lovely waterfall style 'Art Deco' table came in looking pretty, but went out looking beautiful! When it came to us, the center leg had fallen off and needed repair so that it would be useful again. So we stripped the golden hue finish off of the table, and repaired the leg. Then we applied a Jacobean stain to the legs and table top, and as an interesting accent we applied a Natural stain to the banding around the bottom of the table top, the corner caps and the accent 'wing' pieces. The entire table then got a 'gloss' finish which made the wood look wet. It came out so beautiful. I really love the new stain choice our customer decided on. I think it gives a more modern sophisticated look than the old gold hue.
As you can see, the color combination we used really made the corner details stand out. Before, the corners were pretty but not particularly noticeable. Now with that dark color on the corner cap and wing details they are a beautiful interesting feature. To me, it looks like a bird, with the dark head and wings.
Wednesday, May 25, 2011
Fabricated Table Leaf for a Fancy Table Top
This beautiful table left our shop yesterday, after having finished it's time under our care. Among other things, it needed a new leaf made so that it could stretch out and accommodate more people. The table has a fancy veneered top featuring panels that radiate out from the center, and a border all around the outside. It would have been rather costly for the owner of this table, had we attempted to do some kind of fancy marquetry to match the rest of the table. Fortunately the table had a section right down the middle with consistent horizontal grain. We used the same kind of veneer for the leaf and matched the horizontal grain pattern. The leaf also needed to have 'skirts' made on the edges.
Once the leaf was fabricate we finished the entire table in a water based Brown Cherry stain with a water based Satin finish. The table also got a 'pore fill' treatment which made the top perfectly smooth. This treatment is quite a bit of extra work and our Finisher did a great job at it. We are so happy to see this table and it's matching hutch leave our shop with it's happy owner!
Tuesday, May 17, 2011
Overcoming the Power of an Old Berry Stain
We have a few pieces in, from different customers, which offer us a unique challenge. These pieces came in to be stripped of their old finish, and have a new finish applied. All of these items went through the stripping process, after which we discovered that part of the original staining work would linger. You see, these pieces were colored with a dye, that could not be removed in stripping.
This dye is a Berry based stain and penetrates the wood fibers to permanently color them, as opposed to a pigment color, which we would use, that sits on top of the wood. You can find this dye used in old furniture as well as modern, so we never know when it will pop up.
Sometimes this kind of dye is used on a lighter colored wood, such as Poplar to make it match, say a Mahogany wood, then a pigment stain can be applied over both, and it will look like they are the same kind of wood.
In the case of this Piano Stool, we were able to remove some of the color during the prep sanding process, which left the red in the crevices. Instead of letting this be a problem, we used the red as a natural 'highlighting', to give the stool some extra character. Then we used a medium Cherry dye which helped to even the color out without making the stool to dark. Of course the stool has our super earth friendly Water Based Finish over all of that!
How do you think the stool looks? Have you ever had to deal with a dye stain like this? If so, what did you end up doing with the new finish? We would love to hear, in the comments below.
This dye is a Berry based stain and penetrates the wood fibers to permanently color them, as opposed to a pigment color, which we would use, that sits on top of the wood. You can find this dye used in old furniture as well as modern, so we never know when it will pop up.
Sometimes this kind of dye is used on a lighter colored wood, such as Poplar to make it match, say a Mahogany wood, then a pigment stain can be applied over both, and it will look like they are the same kind of wood.
In the case of this Piano Stool, we were able to remove some of the color during the prep sanding process, which left the red in the crevices. Instead of letting this be a problem, we used the red as a natural 'highlighting', to give the stool some extra character. Then we used a medium Cherry dye which helped to even the color out without making the stool to dark. Of course the stool has our super earth friendly Water Based Finish over all of that!How do you think the stool looks? Have you ever had to deal with a dye stain like this? If so, what did you end up doing with the new finish? We would love to hear, in the comments below.
Labels:
Berry Dye,
Berry Wood Finish,
fine Furniture,
finishing,
furniture,
Furniture Stripping,
Pigment colors,
restoration,
shop,
staining,
Water-Based Finish,
wood finishing,
wood staining,
woodwork
Monday, May 16, 2011
Completed Work on Headboard Extension
A while back I was telling you all about a project we were working on, then I completely forgot to show you the final product! Well here it is, a beautiful bedroom set which we refinished. But the biggest part of this project was the bed. It started out as a Full sized bed, and we turned it into a Queen sized bed. Can you see from this picture what we did?
In case you can't figure it out, you can check it out in these older posts...
http://furniturerenewalist.blogspot.com/2011/02/update-on-full-to-queen-bed-project.htmlhttp://furniturerenewalist.blogspot.com/2011/02/bed-extensions-making-full-into-queen.html
Now that the set is done, I think it looks very good. You can hardly tell that one of the dressers is not actually from the set! What do you think of the work? Do you like the design for the headboard and footboard extensions?
Labels:
Antique restoration,
Bed Modification,
Fabrication,
fine Furniture,
finishing,
Full Bed,
furniture,
Furniture Repair,
restoration,
staining,
wood finishing,
wood staining,
woodwork
Friday, May 6, 2011
Progress On Our Latest Faux Finish Project
Our latest Faux Finish project is coming along very well. As with all of these projects, there is a point where I look at the piece and go, 'Um.....really? How is that going to look not weird?' But then the work progresses and I start seeing the vision of our Faux Finish Visionaire start to come come alive.
We began by mixing our own custom creamy yellow base color, which we applied to the side panels on this cabinet, and to the frame sections on it's doors. We also applied this color to 4 sections of a coffee table that is going to co-ordinate. After applying the base, The doors and the coffee table also received a coating in select areas of a Bayberry green color which you can see very well in the doors above. The side panels have had a Red Pepper color rubbed into the cracks and crevices, followed by a Van Dyke glaze. It looks very cool. The coffee table and doors also have had a Van Dyke glaze overall, which give them such a neat aged look.
I have gotten past the 'that looks weird' stage, to the 'wow, that looks cool' stage and am looking forward to seeing these completed! What do you think of these color effects?
Friday, April 29, 2011
Another Interesting Faux Finish In The Works
We are getting more and more 'faux finish' projects in, here at the shop. This latest one is quite a bit of fun, and took some creative thinking to come up with the design. The couple who owns this piece has decided they are tired of the dark, heavy quality of their current decorating scheme and has brought a cabinet and coffee table to us to 'lighten' in some way. After discussing the customer's vision for their home, we came up with an idea which made them happy.
We are beginning with a creamy color, almost a pale yellow, on certain sections of the pieces. We will also be using green tones and a vibrant red pepper to accent. I know in probably sounds a little crazy, but just wait until you see the finished product. I have learned that faux finishes tend to look a little odd at some stage, but once the steps are completed, the finish looks stunning. Check back in a bit to see the completed look!
Monday, April 18, 2011
Big Day In The Spray Booth
| THE FINISHER in action! |
It is an exciting day in our Finishing Area! We have several very large items being worked on right now, and most of them will be done within a few days.
Just to give you the tally, we have 3 Dining Room Table Tops, 4 Table Leaves, 1 Vanity Table, 1 Pedistal Table Base, 2 Sideboards, and the top of a Hutch. That is quite a bit of finishing to do! And as soon as all of these items are out of the way, there are more items to fill the space.
It is nice to know that we are spraying a water based finish on these table tops, so that when families sit down to eat, the surface they are eating off of is safe and non-toxic! Most other finishes used are still solvent based, flammable and contain toxins. The most widely used furniture finish, conversion varnish, contains formaldehyde. Newer formulations have reduced the quantity, but even small amounts are dangerous. A January 2007 article posted on the U. S. Environmental Protection Agency's website outlines some of the concerns with conversion varnish. Here are relevant excerpts:
One type of coating used extensively in the furniture industry is the alkyd/urea-formaldehyde topcoat. These are thermosetting resins and are frequently called conversion varnishes or catalyzed finishes...From an indoor air perspective, these varnishes are of interest because volatile organic compounds (VOCs), including formaldehyde, may be emitted during use...The long-lasting formaldehyde emissions can cause elevated concentrations in indoor environments.
A chart on that web page illustrates that it can take up to 3,000 hours for the level of formaldehyde emissions to drop to the level determined acceptable by the U. S. Department of Housing and Urban Development.People sensitive to certain solvents may also have trouble with the off-gassing of the solvents in modern reformulated lacquers which are VOC compliant.
It is not difficult to conclude that the best choice in finishes from the perspective of health and safety, is certainly water based finishes.
Is your dining room table safe to eat off of? If not, bring it to us, we would be happy to give you a nice new SAFE water based finish!
Wednesday, April 6, 2011
Art Deco Chair gets a Unique Treatment
I am very excited about this project. This chair is going to go in our office when it is completed, so there is a bit of a 'personal' investment I suppose. Three matching chairs were dumped on us when the owners decided they didn't want them anymore. We are finishing them each differently, and this is the last one.
We started out by painting it with a cream colored Milk Paint. This Art Deco chair has interesting carving, so we are filling in all the little groves with red. It is going to look so good.
Then once that step is completed we will do some glazing to add texture and a final coat of a Van Dyke Brown over the entire chair for an aged look. I am sure I will post again as progress on this little chair continues.
I think the red is looking good! What do you think?
We started out by painting it with a cream colored Milk Paint. This Art Deco chair has interesting carving, so we are filling in all the little groves with red. It is going to look so good.
Then once that step is completed we will do some glazing to add texture and a final coat of a Van Dyke Brown over the entire chair for an aged look. I am sure I will post again as progress on this little chair continues.
I think the red is looking good! What do you think?
Monday, April 4, 2011
Jenny Lind bed gets a Makeover
A few posts ago I told you about this lovely 'Jenny Lind' bed which had a broken spindle on it's footboard. We were able to make a custom 'turned' new spindle to exactly match the old ones. To read more about this you can check out my older blog post here....
Since that post, the newly made spindle has been put in place, a new bedrail has been made to replace an old broken one and the entire finish has been restored. Of course to do that restoration, we had to match the new spindle and new bedrail to the existing finish. Then the entire bed received a new water based top coat to make it shiny and new looking.
I think the work we did on this bed is pretty impressive. You would never know from looking at it that a spindle had ever needed to be replaced!
Wednesday, March 16, 2011
Clues to your Antique Trunk's Age
| Trunk #1 |
| Trunk #2 |
| Trunk #3 |
![]() |
| Trunk #1 Trunk #2 Trunk #3 |
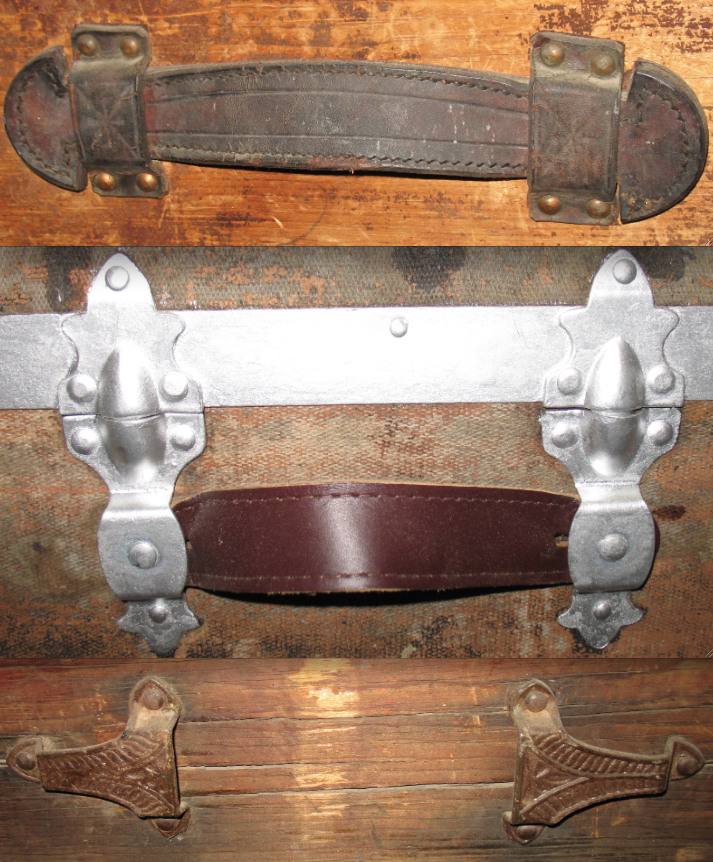
Again, Trunk #1 and Trunk #3, while having different hardware this time, have the same style of handle, called an 'Anchor Style'. Since the leather is gone in #3 it is hard to tell, but try and imagine the same shape of leather as #1, fitting into that fancy hardware. Trunk #2 has a 'Slotted Style' handle with an end cap that holds the handle onto the trunk. Another small hint that this trunk is just a few years newer that the other two.
| Trunk #4 |
Trunks #4 and #5 are very different than the other 3. Trunk #4 has a metal covering over the wood. The metal is embossed with an alligator skin print, has a curved top, and wooden slats. The metal covering, pared with the hardware give us very good clues to when this trunk was made. The handles are in a style called 'Plain Style w/ End Cap' which is different from any of the other trunks we have in right now. So as to the era, we have seen pictures of trunks with this exact same hardware, and embossed metal, which were built in 1890. So this trunk is very old, but still a bit newer then those shown above. 

| Trunk #5 |
So tell me, have you learned anything new by reading this? I would love to help you discover more about the treasures you have hiding away at home. Bring them in to us! Give us a challenge!
Wednesday, March 9, 2011
Update on Unique Tambour Unit
I previously posted about this unique style of a roll top desk tambour unit. Work is almost done and I wanted to give you an update. In case you didn't read the earlier post, you can catch up at the link below, then get on with reading this post....
http://furniturerenewalist.blogspot.com/2011/01/tambour-unit-for-roll-top-desk.html
After the unit was all in one piece again, we had to repair a few of the slats which were chipped. They were small breaks near the ends of the slats, so we were able to just put in a veneer patch. The patch then needed to be colored to match the rest of the wood.
Because of the way this tambour unit was made, it tends to be rather stiff. To combat this stiffness, we have it settling into a curved shape on this rack we made just for this job. We have also stained in between each slat so when the unit is in this position, you will not see a lighter section where the wood edges show. The final work to be done on this beautiful tambour unit is to apply a water based topcoat sealer, for further protection.
Thursday, February 24, 2011
The Ambidextrous Bentley Dashboard
Our part in this task was to work on the dashboard. In the first picture, you can see the dash as we were just starting the job. (I apologize for the dash being upside down!). To do the task, we flipped the wood over and altered the shape of the glovebox and instrument panel openings so that they worked the other way.
The on the backside of the center opening there was a routed out section which you can see in the top photo. We filled this with bondo, and routed out a new section on the oposite side. After staining the newly adjusted dash, we hand painted a black 'pinstripe' around each opening, as you can see in the second photo.
This project took lots of very careful work but is almost done. The new finish looks beautiful. We are going to sand the finish with a very high grit paper to make the wood pores disappear. Then it will get a topcoat of our water based finish, and this dashboard will be ready to be put in use again. This time on the right side of the road!
Monday, February 21, 2011
The Runaway Arm Chair
Imagine the horrible feeling you would get from watching through your rear view mirror as your dining room ArmChair tumbles out the back of your truck, does a few somersaults down the road and then comes to a stop with the arm broken off, the joints loosened and a considerable amount of road rash decorating it's edges. That is exactly what the owner of this chair went through not to long ago.
Fortunately for him, found our shop and brought the chair in for repair.
With each joint we took apart to re-glue, we found more that were loose. So almost the entire base of the chair was re-glued. The broken arm was repaired and the extensive damage to the finish was fixed. To do this, we filled all the recesses with an epoxy filler, sanded all the abrasions smooth and then colored it to blend. We had to do the color work by hand because the wood grain had to be painted in, and any distressing present in the original finish work had to be replicated.
The chair came out very well. The chair's owner came and picked it up today as was delighted with it's fresh appearance. We love having happy customers walk out our doors!
Fortunately for him, found our shop and brought the chair in for repair.
With each joint we took apart to re-glue, we found more that were loose. So almost the entire base of the chair was re-glued. The broken arm was repaired and the extensive damage to the finish was fixed. To do this, we filled all the recesses with an epoxy filler, sanded all the abrasions smooth and then colored it to blend. We had to do the color work by hand because the wood grain had to be painted in, and any distressing present in the original finish work had to be replicated.
The chair came out very well. The chair's owner came and picked it up today as was delighted with it's fresh appearance. We love having happy customers walk out our doors!
Wednesday, February 9, 2011
The Finisher In Action!
The Finisher (also known as our boss, Steve) applying a coat of water based sealer onto a 1930's era, waterfall style bedroom set. It already has a Natural colored water based stain coating which was applied yesterday.
Monday, February 7, 2011
Waterfall style 30's Bedroom Set
This chest of drawers is part of a large bedroom set including a vanity, night stand, vanity chair, etc. It came in with this dated white 'antiqued' paint all over the set. I guess the paint gives it a sort of cute country charm. But that is not quite what the current owner wanted. They brought it to us to have a complete 'makeover'.The makeover began by stripping all that paint off. Paint is not easy to remove, but had the owner tried it themselves, they would have had a horribly difficult task on their hands. Fortunately, we have a very good, immersion stripping system here and that paint practically melted off. Boy were we all in for a surprise when we found what was hiding under that paint!
The veneer work on this set is beautiful! I can hardly imagine what the decision process was to cover it with paint! This 30's era 'Waterfall' bedroom set displays beautiful, intricate veneer marquetry not seen in furniture with a more recent date. But it also is just a bit more intricate then other pieces of the same period. The set has been sanded at this point and is ready for finishing.
The customer has decided on a 'natural' stain, which is an excellent choice to bring out the different colors of the varying kinds of wood used. The natural stain has been applied in this picture, and already the side panels have a deeper color than the decorative edges. Once we put the Finish Coat on, the differing kinds of wood grain be even more enhanced, and this bedroom set will be worthy of quite a lot of admiration.
Labels:
Antique restoration,
Antiques,
fine Furniture,
finishing,
furniture,
Furniture Repair,
Marquetry,
restoration,
shop,
staining,
Veneer,
Veneer Marquetry,
wood finishing,
wood staining,
woodwork
Subscribe to:
Posts (Atom)