Pages

Showing posts with label Trunk. Show all posts

Friday, January 4, 2013

Making a Cloth Hinge


I really enjoy working on all of the various trunks that come into our shop.  Each one is such a unique project that requires creativity and imagination.  I also like the sense of adventure that trunks have.  You know that they came from somewhere.  They went on some interesting journey, they have a story.

They also get pretty beat up while on that interesting journey.  This trunk was brought in to our shop by a young woman who's grandfather used while coming to America many many years ago.  It still has her family name scrawled across the top in yellow, and on a label on it's side.  The most significant 'beat up' area of this trunk was on it's tray. It was covered in cloth and the cloth was beginning to show signs of age.   We were able to repair much of the damage to the tray cloth and I am especially proud of the work we did on the cloth hinge.      The lid for the tray is made of two parts which fold back to reveal the inside.  The cloth fold had ripped so the lid was in two pieces.  Using new cloth and special glue, we made a new 'hinge' on the underside of the lid.  It is designed to lay flat when the lid is closed and then fold when it is open.  When it is closed, the hinge is completely invisible.  You can see the newly functioning lid hinge in the pictures below.

Tuesday, September 20, 2011

Protective Gear and Sanding

All geared up and ready to start sanding!
 After my last experience sanding with a flap wheel sander, which left me completely covered with sanding dust, (which I have chronicled in this post ... Lessons In Sawdust And Sanders) I decided I needed to prepare a bit better this time.

This time I brought a bandana to keep the dust out of my hair, wore proper eye protection, and used an actual dust mask instead of a rag tied around my face.  I also had in a pair of very effective ear plugs!  It is amazing how well those things worked!    They completely blocked out all the chuckles and laughter of the 'real' workers in the shop as they watched my stumble through sanding this old trunk.

The sanding queen!
I also put on a pair of anti-vibration sanding gloves after a while, to keep my hands from suffering to much.  This experience with a non-dust collected sander was much better then the last.  I didn't get as much done as I would have liked however because my arms began to get tired from trying to control this unruly spinning sander.  Oh well,  the 120 grit sanding is almost done.   Just 4 more of the wooden straps to go and then I will treat all the wood with Oxalic Acid to get the grey out.

 After 130 years, the metal has turned the wood a bit dark, so the Oxalic Acid will help lighten it up a bit.  Once the wood has been treated, I will sand the entire thing again with 180 grit and then I get to the fun part, staining!  I have so many options with staining, I have to think about that a bit.  What would you choose?

Friday, May 13, 2011

Old Steamer Trunk After Complete Restoration

This old trunk came to us partially dis-assembled by it's good intentioned owner. They had wanted to fix it up themselves, but realized it was way to big of a project for them.  It still had a little bit of the green painted canvas and a few strips of metal left on the box, but other then that, it was in pieces.  They had been able to salvage almost all of the original hardware. The tin strips were rusted so they would need some work, but the cast brass edge and corner pieces were still looking gorgeous. We treated all the tin sheeting that went on the trunk with a rust arrestor. This would keep any rust damage from spreading. All the tin was then painted a shiny black.  All of the wooden slats that decorate the trunk had been marked for us so that we would know where they went once the trunk was re-assembled. This was a big help, and saved us from needing to solve many puzzles. We re-glued any cracks and breaks. Then the slats were stripped, sanded and given a beautiful new water based finish.


We also applied a new canvas cover over the box and painted it a green, very similar to the original green color.  We then put the shiny black tin strips on,  and all the renewed wooden slats.  The brass hardware looks amazing now on this trunk. We don't often get to restore a trunk from it's base, we usually try and make it look as good as possible, without taking the entire thing apart.  We are so please with how this trunk turned out though, that hopefully we will get to do more trunks in such a thorough way!

Tuesday, April 26, 2011

Re-Canvasing an Old Steamer Trunk

 The work continues on our most recent trunk project.  Once all the repairs were done to the trunk box we moved on to the next step.  Yesterday our Repairman began to re-canvas the box.  It is so exciting for us to be working on a trunk to this extent.  We usually don't get to do the re-canvasing part.

Our Repairman began by using wallpaper glue on the wooden portion instead of on the cloth.  We found that by applying in on the box instead of the cloth it didn't soak through as much, which will be good for when we need to paint it.  Once the glue was smoothed on the wooden portion, the canvas was stapled onto one side,  smoothed across, then stappled on the other side.  Then we smoothed the canvas again before adding more staples.  Once the canvas is securely glued, we can remove the staples and paint the canvas.

To see the last post on this trunk you can look here.....

http://furniturerenewalist.blogspot.com/2011/04/restoring-trunk-from-its-core.html

Tuesday, April 19, 2011

Restoring a Trunk From it's Core


We work on trunks all the time at the shop.  In fact, we had two come in just this afternoon.  Some only need a tiny bit of cleaning, or new handles.  Other trunks that come to us need quite a bit more work.  That is the case with this trunk!  The husband of the woman who owns this one decided several years ago to try and restore it himself.  So he took all the hardware and metal and wooden slats off, then realized that the project was much to big for him.  So his wife brought the trunk to us.

We have begun working on the trunk and are finding ourselves pretty excited about this one.  We don't very often get to restore a trunk from the very base!   The trunk is currently a plain wooden box.  It needs a few repairs, then we will re apply the canvas to the outside of the box before any other parts are put back on.  Today our Repair Craftsman treated all the metal parts with a rust stop product, which gives it an interesting bluish hue you can see here.


All of the wooden parts have been marked so that we know where they go once we begin to assemble this piece.  I am so excited to be able to show you the pictures the work progresses on this trunk.

Tuesday, April 5, 2011

An 1870's Steamer Trunk comes out clean

 I have blogged about this trunk previously, to talk about it's age and such, but we just did some work on it and I am pretty impressed.    The owner of this trunk already had a good thing going, because there really isn't much structurally that needs to be repaired.  The leather handles and pull are shot and the locking mechanism is damaged.  The leather that once covered the outside was removed and we still need to make a new lid-stay to keep the lid up.
But the biggest thing that this trunk needed was a cosmetic face lift, which we made major steps to accomplishing recently.  After the old leather covering was pulled off we put the trunk through our cleaning tanks.  Not the stripping tanks mind you,  just the two cleaning tanks.  The wood came out so clean that all of us here at the shop have marveled at it,  it almost looks like new wood!   We have also treated it with 'Rust-Stop' which gives the metal a bluish-black look.  I like the look, but it is up to the customer to decide the final treatment of the metal, and of course the rest of the trunk.


Do you have an old trunk hiding away somewhere?  Bring it to us!  Let us make it beautiful for you again.

Wednesday, March 16, 2011

Clues to your Antique Trunk's Age

Trunk #1
 We have 6 trunks in our shop right now, possibly a record for us.  We love working on trunks though so this is fun for us.  One of them has been completely taken apart so had I taken pictures of it, you would have just seen a plain wood  box and a pile of parts.  So I left it out this time.


Trunk #2
 With so many trunks in our shop, I thought it would be interesting to see if I could find out some history about each one.  So I have been flipping through my 'history  books' and investigating hardware and tin, end caps, etc.


Trunk #3
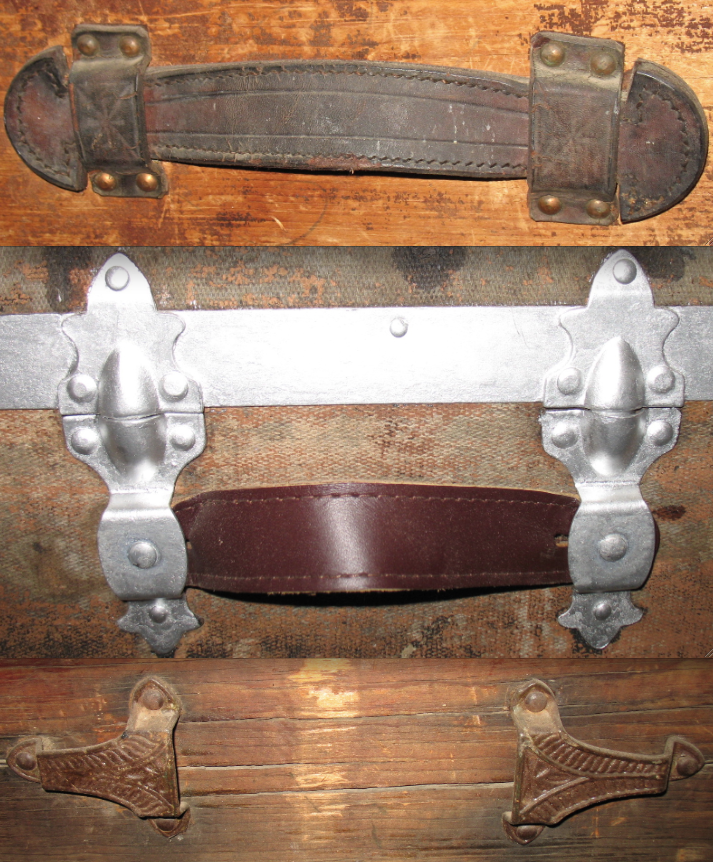
Trunks 1-3 are very similar, displaying the same style of design and hardware.  They are all most likely made between 1870 and 1885.  Trunk #1 and Trunk #3 have the same clasps on the front, with Trunk #2 only having a very slight variation.  Trunk #2 seems, by it's hardware to be just a little newer than the other to.  But probably only by a few years.  You can see the clasps below...
Trunk #1                     Trunk #2                    Trunk #3
While their clasps are so similar,  the handles are all completely different!


 Again, Trunk #1 and Trunk #3, while having different hardware this time, have the same style of handle, called an 'Anchor Style'.  Since the leather is gone in #3 it is hard to tell, but try and imagine the same shape of  leather as #1, fitting into that fancy hardware.  Trunk #2 has a 'Slotted Style' handle with an end cap that holds the handle onto the trunk.  Another small hint that this trunk is just a few years newer that the other two.


Trunk #4

Trunks #4 and #5 are very different than the other 3.  Trunk #4 has a metal covering over the wood.  The metal is embossed with an alligator skin print, has a curved top, and wooden slats.  The metal covering, pared with the hardware give us very good clues to when this trunk was made.  The handles are in a style called 'Plain Style w/ End Cap' which is different from any of the other trunks we have in right now.  So as to the era, we have seen pictures of trunks with this exact same hardware, and embossed metal, which were built in 1890.  So this trunk is very old, but still a bit newer then those shown above. 


Trunk #5
 Finally, Trunk #5.  This one came to us already restored, but just needing a new lock and handles.  This one looks almost new!  It was restored probably about 50 years ago and given an interesting camouflage(ish) paint job.   To try and figure out the age of a trunk, you can look at many factors, the most enlightening being  the material it was made out of,  it's shape and size,  and the hardware used.  This trunk displays hardware and styling of a trunk made between 1900 and 1925, but because of it's large size, it most likely dates during the earlier part of that era.

So tell me, have you learned anything new by reading this?   I would love to help you discover more about the treasures you have hiding away at home.  Bring them in to us! Give us a challenge!


Tuesday, February 22, 2011

From Rusty to Shiny, A Trunk in Progress

 We get lots of trunks in to our shop for repair.  Which is great, we love working on these items.  They often hold stories of adventures, memories of loved ones, and dreams of distant lands and times.  One of the trunks we currently have underway was sitting in water for some time.  The tin on the base of the trunk was completely rusted, and we were worried that the wood underneath the tin would be rotten as well.

After removing the old tin, we discovered that the wood underneath was just fine.  What a relief!  Today we replaced the tin, re-attached the wooden straps that hold it in place, and then used tiny nails across the two side edges where the tin is showing. I think the nails add a nice decorative touch.

When dealing with partially rusted metal, the our customers had a few options.  They decided they wanted to use their old hardware as much as possible.  So we applied Rust-Stop to all the metal which gave it a slightly bluish cast.  The customers then decided they wanted the metal to look silver again, as it would have when the trunk was new.  So the step we are currently in process on, is painting all the metal with a silver paint.

Do you like the new look of the metal?

Friday, January 21, 2011

Paper Trunk that Fooled Us

 This is quite a unique little trunk.  Smaller than your average steamer trunk, I can imagine it would fit men's clothes,
much better than the volumeous women's clothing worn generations ago.  This trunk has the look of aged painted leather, and our task was to clean it then restore it.  Unfortunately, right away when we began cleaning it, we discovered that it was not covered in leather after all, but Paper!

We stopped cleaning immediately and asked the customer to come in
and look at the trunk to decide what course of action to take next.  The customer does have several options at this point.  The top will need a coat of laquer to keep the paper from deteriorating further.  They could choose to laquer the entire trunk, and leave it's appearance as is,  or they could choose to paint it which would give a huge range of possibilities
for the trunk's appearance.  They could go with a simple, all one color paint, or it could be distressed to mimic age.  Or the Leather look that is currently on the trunk could be re created.  I am looking forward to finding out what they choose. And I will be sure to let you know.


Tuesday, January 18, 2011

A Nice Old Trunk Gets Clean

We get to do quite a bit of work on old trunks, and each project, I think,  is interesting and unique.  It seems that people used to personalize their trunks to some degree, so they come to us in all different conditions.  This trunk was painted all over in a seafoam blue/green color.  Even the metal was painted!  The current owner decided the painted, then worn out look wasn't for her, so she brought it to us.   We stripped the trunk for her and it came out  very clean.  The interesting thing about this strip job?  The trunk is covered in cloth!  Yes, apparently we can strip furniture with a cloth covering, and get it clean.  I am pretty impressed with our skills, if I may say so myself!

The trunk's owner is going to take the trunk home as it is.  She is going to sand the wooden slats, then coat the entire trunk with a colored wax.  I think it is going to turn out very nicely.