I suppose this dashboard isn't truly ambidextrous. But it is being switched from a right side drive, to a left side drive, which I think is just as neat of a trick. When our customer purchased this vehicle, it was being driven in Great Britain, where everyone drives on the wrong side of the road. To make life simpler for himself, he decided to have the entire vehicle flip-flopped.
Our part in this task was to work on the dashboard. In the first picture, you can see the dash as we were just starting the job. (I apologize for the dash being upside down!). To do the task, we flipped the wood over and altered the shape of the glovebox and instrument panel openings so that they worked the other way.
The on the backside of the center opening there was a routed out section which you can see in the top photo. We filled this with bondo, and routed out a new section on the oposite side. After staining the newly adjusted dash, we hand painted a black 'pinstripe' around each opening, as you can see in the second photo.
This project took lots of very careful work but is almost done. The new finish looks beautiful. We are going to sand the finish with a very high grit paper to make the wood pores disappear. Then it will get a topcoat of our water based finish, and this dashboard will be ready to be put in use again. This time on the right side of the road!
Thursday, February 24, 2011
Tuesday, February 22, 2011
From Rusty to Shiny, A Trunk in Progress
We get lots of trunks in to our shop for repair. Which is great, we love working on these items. They often hold stories of adventures, memories of loved ones, and dreams of distant lands and times. One of the trunks we currently have underway was sitting in water for some time. The tin on the base of the trunk was completely rusted, and we were worried that the wood underneath the tin would be rotten as well.
After removing the old tin, we discovered that the wood underneath was just fine. What a relief! Today we replaced the tin, re-attached the wooden straps that hold it in place, and then used tiny nails across the two side edges where the tin is showing. I think the nails add a nice decorative touch.
When dealing with partially rusted metal, the our customers had a few options. They decided they wanted to use their old hardware as much as possible. So we applied Rust-Stop to all the metal which gave it a slightly bluish cast. The customers then decided they wanted the metal to look silver again, as it would have when the trunk was new. So the step we are currently in process on, is painting all the metal with a silver paint.
Do you like the new look of the metal?
Monday, February 21, 2011
The Runaway Arm Chair
Imagine the horrible feeling you would get from watching through your rear view mirror as your dining room ArmChair tumbles out the back of your truck, does a few somersaults down the road and then comes to a stop with the arm broken off, the joints loosened and a considerable amount of road rash decorating it's edges. That is exactly what the owner of this chair went through not to long ago.
Fortunately for him, found our shop and brought the chair in for repair.
With each joint we took apart to re-glue, we found more that were loose. So almost the entire base of the chair was re-glued. The broken arm was repaired and the extensive damage to the finish was fixed. To do this, we filled all the recesses with an epoxy filler, sanded all the abrasions smooth and then colored it to blend. We had to do the color work by hand because the wood grain had to be painted in, and any distressing present in the original finish work had to be replicated.
The chair came out very well. The chair's owner came and picked it up today as was delighted with it's fresh appearance. We love having happy customers walk out our doors!
Friday, February 18, 2011
The Case of the Woodgrain Illusion
I have an interesting tidbit for my readers today. We have finished work on this beautiful Waterfall Bedroom Set. The veneer is so intricately put together, we admire it every time we pass it here in the shop. One interesting thing we have noticed as we pass the set, in that the wood seems to change depth and color as we go by.
If you look at this piece from the left you can see a checkerboard pattern of dark and light. But then if you look at in from the right the pattern reverses. If you look at the piece straight on there is no checkerboard pattern at all and the veneer looks even in depth.
This interesting phenomena is called 'Flashing'. It is caused by the laying down of each piece of veneer in an alternating right-side-up and up-side-down pattern. The grain then catches the light differently causing one part to look dark, and another to look light. This can bee seen anytime the veneer is applied with the grain alternating, as can be seen below.
I think this is pretty neat, do you?
Wednesday, February 16, 2011
Re-Weaving of an Antique Ladies Rocker
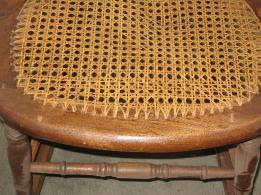
One of the delights of our work is giving new life to an old piece of furniture. This rocker dates from the mid-nineteenth century, we guess 1860s. It is a lady's rocker, having hip rests not arms. These are also called nursing or sewing rockers. As can be seen from the photo just below, when it came to us the finish was worn and the weaving atrocious. The cane fibers were both broken and very poorly woven the last time around. Possibly they are broken because of the uneven, sad weaving job. What you can't see is that all the joints were also loose. So, we completely disassembled the chair and re-glued it, stripped it, rewove it and refinished it. We used tung oil for a finish and then paste waxed it to yield the beautiful and original appearance it now enjoys. We figure with reasonably good care this rocker should be good for at least another fifty if not one hundred years.
As It Came To Us |
After Re-Weaving, And Other Repairs |
Tuesday, February 15, 2011
Repair to Veneer on Water Damaged Armoire
This unfortunate Armoire received quite a bit of water damage during storage. It had been disassembled and stacked and then put in the garage. The water damage cause the veneer which covers the piece to crack, peel and flake.
Fortunately, we have a Restoration Specialist here at the shop who is very good with a veneer saw. For the inside of the doors we pieced in Birds Eye Maple veneer to replace the damaged sections. Although the patches are considerably lighter right now, once we are done with them, all the wood will blend.
On the outside of the doors a Walnut veneer was used. So we found a matching Straight Grained Walnut which had to be cut at an angle to blend with the old wood. This is very tricky work, and our Restoration Specialist has done an excellent job.
There are patches of veneer which we have had to replace all over these doors, and both sides of the Armoire. Once all the patches are securely in place, we will strip the whole thing, and give it a beautiful new finish. I am looking forward to showing you more pictures of this project!
Monday, February 14, 2011
Update on Full-to-Queen Bed Project
In my last post, I showed you all a Full Sized Bed that we are modifying to make into a Queen. I just wanted to give you a bit of an update on that project, as I think it a fascinating one. In the top picture you can see what the existing carving on the top of the headboard looks like.
In the picture above you can see one of the new extensions cut from the old bed rails, while it is in the process of having decorative carving applied. We created a design for the carving that mimicked the design on the headboard and foot board. This carving will be featured on all 4 extension pieces. I love the creativity that goes into the work we do here. This is such a good example of that creativity in action. To create a design that will flow seamlessly with the original bed is like creating art. But our craftsmen don't just design, they have the skills to put that design into action.
Thursday, February 10, 2011
Bed Extensions, making a Full into a Queen
This bed came in as part of a complete bedroom set, which. We have already stripped the entire set of the finish you see in this picture and are now moving on to repairs and other interesting projects. Well, I guess I should say, project. This is a Full sized bed, most older beds were not made in a Queen or King size. The customer is asking us to design an extension so that the bed can be made into a Queen. We love interesting projects like this where our creativity can shine.
What we have decided to do, is make the extensions using the old bedrails. Since a Queen is longer than a Full, they will need to be replaced anyway. If we use the wood for the extensions, then it will match the rest of the bed, as far as age and grain. We don't want them to look like awkward extensions though, so they have been cut to match the decorative panel at the top of the Headboard, an the carving on the top of each extension mimics the carving on the head and footboard. I think it is going to turn out so well, and I can hardly wait to show you the finished result.
Wednesday, February 9, 2011
The Finisher In Action!
The Finisher (also known as our boss, Steve) applying a coat of water based sealer onto a 1930's era, waterfall style bedroom set. It already has a Natural colored water based stain coating which was applied yesterday.
Monday, February 7, 2011
Waterfall style 30's Bedroom Set
This chest of drawers is part of a large bedroom set including a vanity, night stand, vanity chair, etc. It came in with this dated white 'antiqued' paint all over the set. I guess the paint gives it a sort of cute country charm. But that is not quite what the current owner wanted. They brought it to us to have a complete 'makeover'.
The makeover began by stripping all that paint off. Paint is not easy to remove, but had the owner tried it themselves, they would have had a horribly difficult task on their hands. Fortunately, we have a very good, immersion stripping system here and that paint practically melted off. Boy were we all in for a surprise when we found what was hiding under that paint!
The veneer work on this set is beautiful! I can hardly imagine what the decision process was to cover it with paint! This 30's era 'Waterfall' bedroom set displays beautiful, intricate veneer marquetry not seen in furniture with a more recent date. But it also is just a bit more intricate then other pieces of the same period. The set has been sanded at this point and is ready for finishing.
The customer has decided on a 'natural' stain, which is an excellent choice to bring out the different colors of the varying kinds of wood used. The natural stain has been applied in this picture, and already the side panels have a deeper color than the decorative edges. Once we put the Finish Coat on, the differing kinds of wood grain be even more enhanced, and this bedroom set will be worthy of quite a lot of admiration.
Labels:
Antique restoration,
Antiques,
fine Furniture,
finishing,
furniture,
Furniture Repair,
Marquetry,
restoration,
shop,
staining,
Veneer,
Veneer Marquetry,
wood finishing,
wood staining,
woodwork
Subscribe to:
Posts (Atom)