Pages

Wednesday, December 22, 2010

Who wants a Paper Seat anyway?


Usually when we replace a woven seat,  we are trying to make it as close to the original as possible.  But with this chair, that is not the case.  The customer opted for a completely different look.  I think it actually looks better than the original.

The chair had a 'Fibre Rush' seat originally.  It makes a pretty pattern, but in actuality 'fibre rush' is just a fancy name for a paper seat.  This seat is easily damaged from liquids and tends to sag more then a natural rush.


We replaced that with a 'Flat Reed' seat.  As you can see, it is a completely different look! On this particular seat we used 3 different widths of reed to give it a textured look.  Flat Reed comes from the center of a Rattan pole.  It is extremely light but at the same time strong, which makes it good for sitting on!

Monday, December 20, 2010

Ornate Walking Cane, Put back together.

There are so many things going on at the shop right now!  I counted 39 wood clamps in use at this moment.  I made a collage using photos of all the clamps in use right now.  You can check it out on our Flicker page here........... or on our facebook page here..... In the mean time though, I chose my favorite of all the current clamping/gluing jobs to tell you about in more detail.    This is by far one of the most unique walking canes I have ever seen.  It is covered with carvings of jungle animals and I am sure the gentleman who uses this gets impressed looks wherever he walks.  When the cane broke, his daughter brought it to us for repair.   If you look very carefully you can see one of the two breaks which runs through the lion's back.  We have epoxied the split and it is set in clamps while the glue hardens.  We chose epoxy to repair it because once it is set, it becomes pretty much indestructible.  That break will never come un-done again!


Friday, December 17, 2010

Final Looks At A 100 Year Old Desk

I am so happy to be able to share with you these pictures.  We have been working on this lovely little desk for a while now, and we are just re-assembling it today.  It had a dark age crackled finish when it came to us and there was an old fashioned metal pencil sharpener screwed into the top right corner.  
The pencil sharpener was removed, and the desk went through our immersion stripping system.  It came out very clean.  We then had to fill the holes left by the pencil sharpener and do some repairs to the drawers. After the repairs, the desk was prep sanded and sent into our finish booth.  This 100 + year old desk got a healthy new water based finish in Semi-Gloss with a  beautiful English Oak stain.  I think it is so good looking now.  One thing I really love about our water based finishes is how we are able to make the wood grain pop.  This desk almost glows.  Have you ever tried a water based finish? 

Hand Shaping of Yesterday's Block Work

We have finished the carving on the chair leg I showed you yesterday.  The chair has now been dis-assembled and other repairs are being done.  But this chisel work is so good, I just had to show you!  I know the new wood is so clean that it stand out from the old wood, but once it is all stained and finished you won't even know the difference.

Thursday, December 16, 2010

Block Work on Broken Chair Legs


Well, besides all our weaving and staining, and wood stripping that is going on today, here is another one of our smaller projects that we are working on at the shop.  This chair has a broken front leg.  The entire leg isn't broken off, just the decorative piece at the end.  It has broken in half, it seems, right along the wood grain.  We have epoxied a block of wood onto the chair, and once it is fully hardened, we will carve it to match the other leg which is still in tact.


We have to do this kind of block work fairly often actually.   Here you can see another leg, this one broken much higher up (you can actually see the seam in the left hand picture).  We cut out a section on the back of the leg, glued the break, and glued in a block.  The block will be formed to fit the leg, and then stained to disappear!

Wednesday, December 15, 2010

Little Maple Chair that Split it's Seams


We have been working on some very big projects lately which unfortunately means some of the little projects have been waiting.  But the big projects got done earlier this week and now we get to move on to smaller things.   This chair is certainly small in stature, but I suppose the project isn't so small after all.  The problem with this poor little chair is that it is made out of Maple.  Maple furniture from the 1950s and 1960s, known as "American Colonial" or "Early American" had a fatal flaw. You see, Maple  shrinks significantly when dried and the seams and joints on pieces made in this era were very inadequately glued as well.  The job of a finish in to protect the wood, so when we stripped the finish off of this chair,  the wood then had a chance to 'adjust' to the dry California air, and all the seams opened up.   We have epoxied the seams back together, now this little chair is ready for a Prep Sanding, and then a nice new protective finish.

Tuesday, December 14, 2010

A Touchup Repair, making scratches go away.

 We do this with trepidation, but we now divulge some trade secrets. The first step in touch-up is to create a background approximating the lightest surrounding color.  This is mixed in shellac and brushed on.


The next step is to add the darker contrasting grain lines. We chose a couple of additional colors of pigment to add to our shellac mixture and applied these with a very fine artist's brush. Each stage in touchup must be sealed in place. We did this with a aerosol laquer sealer.


After all the brush work was done, we used some aerosol toners to blend the repaired area with the surrounding area. We know you may be able still to make out where we worked, but we are equally sure that if you had only the second picture to look at, you would not have guessed where it had been repaired.

Of course there is one more ingredient to a repair of this quality , a little experience is thrown in too!

Update on Faux Finish...

 I just wanted to let you all know how our faux finishing project from yesterday turned out.   When I posted last, we had only put the white on the seat.  Later that afternoon the darker Umber color was wiped on and we got exactly the effect we were working towards!  The seat now matches the back perfectly and you would never know that it had once had a gaping hole, and that the seat caning is now brand new.  I think that means this is a job well done!

Monday, December 13, 2010

Tricky Faux Finish Color Match

We got this very unique loveseat in  recently with a giant hole in the woven seat.  The back is still in great shape, and even has a double caned back, which makes this such a nice piece for the owner.  We were able to replace the seat  easily enough, and now it is time for the tricky part.  Color Matching!   This chair has a very nice artistic finish which makes the color matching an interesting challenge for us.

We began by applying a white base to the cane. As you can see in the picture above, there is white showing through in the crevices where the cane overlaps.   Once this white is completely dry, we will rub on a darker Umber color.  This will create the uneven 'antiqued' look that you can see on the loveseat back.  Pretty neat right?

Friday, December 10, 2010

Redwood Burl Veneer for the Opium Bed


I am sure, if you have been following our blog you have seen that we are working on a very neat Opium Bed from Asia.  We are almost finished, and one of the final steps is to fill in the back panel with a decorative veneer.  It used to have a 'dream stone' but it was lost or broken. The customer still wanted something beautiful and exotic in that place,  so we cut a new back panel and applied a Redwood Burl veneer in a 'butt and book match' layout.  Once the veneer was applied to the back panel, a Tung Oil was rubbed in which made the fiery swirls in the wood leap out. 


This veneer is so beautiful.  I love these fancy burl patterns and when applied so that designs appear, they are even more exquisite. I have a small square table that I have been working on as a little personal project and I am going to use the 4 edge pieces from this same veneer. I am looking forward to having this lovely burl on my own furniture.

Tell me about your latest project.  What do-it-yourself projects do you have going on around your home? Have you ever tried laying veneer?   I will be laying veneer for the first time next week, I will let you know how it goes!

Thursday, December 9, 2010

Striking change in a Buffet Server

I am continually impressed by the work done here at our shop by our talented Craftsmen.  When this Buffet came in, I was not impressed.  Personally, I am not a fan of green furniture.  I know there are those out there who love it, but I just don't see the attraction.  So when this piece came in, I was hoping that it was for more that just a repair job. Sure enough, it was going to be totally stripped down and re-finished.  Yay!  But I never could have thought it would come out as beautiful as it did.   This Buffet has such an interesting combination of woods that the owner decided to just do a 'natural' (clear) stain and a satin finish. Since the main pieces of the buffet are mahogany and the trim & edges are poplar, it ended up having two different colors which gave such a nice highlighting effect.  I love it.  I would love to have it in my dining room!   What do you think?  Do you think the green was better?  Do you like their choice in stain color?

Wednesday, December 8, 2010

Hand Woven Patch on a Caned Chair


We have been getting so much weaving work in at our shop lately.  This chair needed to have it's entire seat we woven by hand.  But the back only had a small broken patch near the edge.  Because this hole was not in the middle, and because the rest of the chair back had such tight weaving, we were able to just put in a woven patch.  Here you can see the chair after the patch was woven in, and before the new cane fibers were stained to match.  Pretty neat isn't it?  This patch will hold up very well and will disappear once the staining is done as you can see below. Yes! That is the same chair!  Pretty amazing isn't it?

Tuesday, December 7, 2010

The Incredible Power of Immersion Stripping.


 We had a pretty major furniture stripping day last week and it included a beautiful bedroom set.  I wanted to show you these pictures because not only do I think this headboard is wonderful, I think the work done on it so far is pretty great as well.
We have a very efficient immersion stripping system here which allows us to get wood items very clean as you can see in these before and after photos.  The wood is so clean that afterwards it just needs some sanding and it is ready for a new stain or paint.  Hand stripping just doesn't get the job done as well as this!
Isn't this headboard fantastic?  I love the old beds that people used to make.  So much character and the height of this piece makes such a grand statement.  

Have you attempted to hand strip something and it just didn't turn out as well as you hoped?  Bring it to us!  And we would love to see photos of your projects in the comments below.

Friday, December 3, 2010

Making Space for New Service Offerings


 Well, we are approaching a season of change here at the shop.  Very soon we will have another skilled craftsman joining our team, and he brings with him some unique abilities.  This means we will be able to offer some new services which is an idea we like very much.  It also means moving things around in our space so that these new services have room to be done.  This meant our Furniture Weaver moved to a new area, which she is perfectly content with.  You see, her new area includes one of the few windows in our building.  She now gets a lovely view, while her fingers work.

Right now our Furniture Weaver is working on this lovely chair.  The seat has been re woven, but the back is still waiting.

Speaking of new services,   What kind of service would you like to see us do?   Which kind of service that we offer do you think is the most interesting to read about?

Wednesday, November 24, 2010

Finishing Colors, the Customer's Choice

This set of chairs is such a beautiful example of the quality of finishing jobs we do here at the shop.   We stripped, prepped and re-finished this set and it came out beautifully.   They have a Fruitwood stain and a Satin finish.   I don't know how many of my readers have had furniture re-finished, but regardless, I think we have a pretty great system here, for making sure the color comes out just how you want it.  After the item is all stripped and prepped, and any repairs are done,  we ask you to come into the shop.  At that time you can choose colors and we will apply them for you in a test patch.  We can try as many colors as you like.  Once you decide which one you like, you can go home.  We then remove any unwanted color and stain the entire piece.  We end up with a winning look just about every time.

Tuesday, November 23, 2010

Great Repair, Amazing Color Work


 I am constantly amazed by the level of craftsmanship that comes from the people who work here at the shop.   Dave,  the Repair Craftsman fabricated this rocker, to replace the one that was missing.  Rockers are tough to duplicate because the curve on the bottom has to exactly match the original.  If they don't match perfectly then the person using the chair will be able to feel an un-even rock.


Once the piece was constructed though, it still had to be made to match the color of the original.  That is where Steve, the Master Craftsman steps in.   He did a very nice job.  Not only does the new match the old in color, but the distressing on the original that occurs with time was mimicked on the new!  This required fancy technique and an artistic eye.

Friday, November 19, 2010

Three projects, all using different skills

For those of you who read my post yesterday about 'stripped door art',  I wanted you to see how the door came out after the stripping process.  It needs to be sanded before it is stained or painted again, but this redwood came out very clean.  Especially considering how much paint was on this, I think it is pretty impressive!  We have people come in all the time who have started to strip the paint or finish off of their wood item and realized, it was a lot more work then they thought, or just not coming off as clean as they wanted.  So they bring it to us and we do the job right!

Another update for you,  the child's rocker project is coming along well.  The seat is all woven, and the back and base supports are wrapped.  We still have quite a way to go on this project but I can see it is going to look so good when it is done.


Back in the finishing booth we have a really nice dresser being completed.   The owner of the piece decided not to use a colored stain, and just let the wood's natural colors shine through.  So that is just what we did, and look how good it came out!  The dresser is made of Mahogany, which is the darker wood you see, and it has poplar trim throughout, which is the lighter wood you see.  Isn't it beautiful?  All it has on it is a natural stain which has little to no color.  I think it is fabulous.

Thursday, November 18, 2010

Stripped Door Art

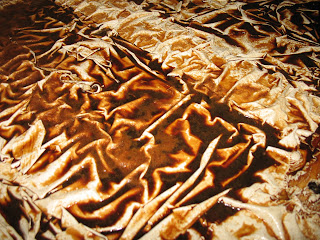
 Today is a stripping day at the shop.  About once a week we pull together all the items that need to be stripped and do it all in one day or afternoon.  Today a painted door is among those items.  I walked back there to see how the work was going and this is what I saw.  The door was being soaked in our stripping tray and the paint was coming up in bubbles off of the wood.
It almost looks like art to me.  If you look at it close, as in this picture the way the paint has scrunched up, creates all these interesting patterns.   What do you think?  Should I print it up and frame it?  Do you think I could put together a collection and make it into a gallery?

Wednesday, November 17, 2010

Before and After, some favorites of the past

This table has to be one of my favorite projects.  I don't know why it stands out for me above so many other wonderful projects we have worked on here at the shop.  But I remember it well.  This table came to us about 10 years ago.  It had this pretty floral Faux Finish painting on the top.  At the time, we did not have a Faux Finisher who could replicate the pattern, but instead of doing a 'boring' basic finish we added some really nice highlighting.  I think that highlighting is what makes this table stand out so much now.  The carving comes alive, and the table top has so much more dimension.

While I am reminiscing about great projects in our past, I had to bring this one up.  It is certainly unique and like the first project, the finish job we did, brought the features out much better than the original.  This Coffee table is made out of a very neat door.  It looks straight out of a King Arthur tale to me.  When the table came to our shop, it was dull and lifeless.  We stripped the table and re finished it.  With the framing a lighter color than the main door, there was new depth added and the details come alive, just as with the first table. 
We have so much fun working on unique projects like this.  It brings out the artist, the creative mind, the visionary in us.  What a great job, where you can let your creativity come out in such a productive way!  

Monday, November 15, 2010

Child's Seagrass Rocker

 Did you have a mini rocking chair when you were a kid?  I did.  Actually, I still have it.  I have a fondness for rocking chairs of all sorts, but children's rockers are just an entire different kind of wonderful, in my opinion.  This one came to us very, very beat up as you can see.  It is made of woven seagrass which is falling apart.  Fortunately we have a Furniture Weaver who is experienced with Seagrass and can put this delightful piece of furniture back together again.  And I mean, all the way back together!  The rocker is in bad enough shape that together with the owners the decision was made to have the chair completely disassembled and re-woven from the frame up.

Below you can see what we are starting with.  I will put more pictures up as the project progresses.   But in the meantime, how about you tell us about the rocker you had as a child?

Friday, November 12, 2010

19th Century chairs, back in beautiful shape again!
This beautiful set of chairs from the late 19th century has actually been featured on this blog  several times. But now the job is completed and I want to show you the highlights of what we did.  When the set originally came to us,  all four chairs needed to be refurbished, but the arm chair had much more work to be done.  The frame of wood that the upholstery would be attached to had at some point been cut out from this chair.  We needed to re-build it.  That meant taking the chair apart.
When we did that, we discovered that the chair seat that remained was severely cracked.  We could tell there had been a prior attempt at a repair, but that it had already failed.  The wood pretty much shredded as the chair was disassembled.  Our very artistic Repair Craftsman drew the sketch below which shows all the different pieces which came apart and had to be carefully put back together like a puzzle.  You can also see the seat once it was all finished,  you can't even see the repairs!  You can also see here the un-stained wood frame we created for the upholstery to attach to.

Now are you ready?  Here is the beautiful completed set! All re-furbished, and repaired.  This set had truly beautiful detailing even before we worked on it,  now it has a beautiful finish to match the beautiful details.  To see past posts we have done on this set, click on the links provided at the bottom of this post.