Pages

Friday, April 29, 2011

Another Interesting Faux Finish In The Works


 We are getting more and more 'faux finish'  projects in, here at the shop.  This latest one is quite a bit of fun, and took some creative thinking to come up with the design.  The couple who owns this piece has decided they are tired of the dark, heavy quality of their current decorating scheme and has brought a cabinet and coffee table to us to 'lighten' in some way.  After discussing the customer's vision for their home, we came up with an idea which made them happy.

We are beginning with a creamy color,  almost a pale yellow, on certain sections of the pieces.  We will also be using green tones and a vibrant red pepper to accent.  I know in probably sounds a little crazy, but just wait until you see the finished product.  I have learned that faux finishes tend to look a little odd at some stage, but once the steps are completed,  the finish looks stunning. Check back in a bit to see the completed look!

Wednesday, April 27, 2011

Sample Squares of Woven Patterns

Our Furniture Weaver is working on an interesting project just lately.  She is making sample squares of different weaves to hang on our wall in the office.  This way, when you come visit us, you can see an assortment of styles which we can put to use on your furniture.  So far she has two completed, and two almost completed, each uses a different material, woven in a different pattern.  This is just the beginning, we will have so many to show by the time this project is done!

Tuesday, April 26, 2011

Re-Canvasing an Old Steamer Trunk

 The work continues on our most recent trunk project.  Once all the repairs were done to the trunk box we moved on to the next step.  Yesterday our Repairman began to re-canvas the box.  It is so exciting for us to be working on a trunk to this extent.  We usually don't get to do the re-canvasing part.

Our Repairman began by using wallpaper glue on the wooden portion instead of on the cloth.  We found that by applying in on the box instead of the cloth it didn't soak through as much, which will be good for when we need to paint it.  Once the glue was smoothed on the wooden portion, the canvas was stapled onto one side,  smoothed across, then stappled on the other side.  Then we smoothed the canvas again before adding more staples.  Once the canvas is securely glued, we can remove the staples and paint the canvas.

To see the last post on this trunk you can look here.....

http://furniturerenewalist.blogspot.com/2011/04/restoring-trunk-from-its-core.html

Friday, April 22, 2011

Mammoth Sized Furniture Stripping Job

We recently got a very big order of stripping in here at the shop. An unfortunate Victorian Home in downtown Sacramento was damaged in a house fire.  The owners and the subcontractor they hired to help them fix it back up have decided to try and salvage as much of the original woodwork as possible.

The subcontractor removed all of the wood paneling and trim from the house and brought it to us to strip. There is Smoke and water damage on most of the pieces, and when you walk by you can smell it!  The woodwork is all wrapped up in batches and  marked so that when they try and put it all back into the house, they don't have as much of a puzzle on their hands as far as where each piece goes.  We began by stripping the doors.  You can see in the picture to the side all the smoke and water marks.  These old houses have many layers of paint which can make the job harder.   Fortunately we have a powerful striping system to take care of business.
We are always interested in better ways to do our job while still being gentle with the environment.  That is part of the reason we are so enthusiastic about the water based finishes we have been using for years.  They work very well, give a beautiful color, and are safe to use.  We have just heard about a new water based furniture stripper and of course had to try it right away.  Below you can see the stripper eating away at the paint on those doors.  While we have asked the manufacturer for a few tweaks, we are  very excited to start using this new product on a regular basis, hopefully within the next few months.  Hooray, finally a furniture stripper that fits into our vision of high performance and health!

Eiffel Tower Table

One of our employees playfully called this the 'Eiffel Tower Table',  which seems a fitting name for it.  It has very delicate, intricate legs and arches which easily remind one of the building in Paris.  And while the construction of the building is certainly sound,  the construction of this table isn't quite as sturdy.  The entire base of this table is made of cut outs which give it a unique 'world traveled' sort of feel, but are unfortunately rather flimsy.  There are quite a number of pieces missing throughout the table but it would have been more work that the customer was ready for us to do, to repair them all.  So instead we stuck with the most important repair, that of fixing the broken leg.  We repaired this table leg with epoxy, so it should never come apart again!

Tuesday, April 19, 2011

Restoring a Trunk From it's Core


We work on trunks all the time at the shop.  In fact, we had two come in just this afternoon.  Some only need a tiny bit of cleaning, or new handles.  Other trunks that come to us need quite a bit more work.  That is the case with this trunk!  The husband of the woman who owns this one decided several years ago to try and restore it himself.  So he took all the hardware and metal and wooden slats off, then realized that the project was much to big for him.  So his wife brought the trunk to us.

We have begun working on the trunk and are finding ourselves pretty excited about this one.  We don't very often get to restore a trunk from the very base!   The trunk is currently a plain wooden box.  It needs a few repairs, then we will re apply the canvas to the outside of the box before any other parts are put back on.  Today our Repair Craftsman treated all the metal parts with a rust stop product, which gives it an interesting bluish hue you can see here.


All of the wooden parts have been marked so that we know where they go once we begin to assemble this piece.  I am so excited to be able to show you the pictures the work progresses on this trunk.

Monday, April 18, 2011

Big Day In The Spray Booth


THE FINISHER  in action!
It is an exciting day in our Finishing Area!  We have several very large items being worked on right now, and most of them will be done within a few days.

Just to give you the tally,  we have 3 Dining Room Table Tops,  4 Table Leaves, 1 Vanity Table, 1 Pedistal Table Base, 2 Sideboards, and the top of a Hutch.  That is quite a bit of finishing to do!    And as soon as all of these items are out of the way, there are more items to fill the space.


It is nice to know that we are spraying a water based finish on these table tops, so that when families sit down to eat, the surface they are eating off of is safe and non-toxic!  Most other finishes used are still solvent based, flammable and contain toxins. The most widely used furniture finish, conversion varnish, contains formaldehyde. Newer formulations have reduced the quantity, but even small amounts are dangerous. A January 2007 article posted on the U. S. Environmental Protection Agency's website outlines some of the concerns with conversion varnish. Here are relevant excerpts:
One type of coating used extensively in the furniture industry is the alkyd/urea-formaldehyde topcoat. These are thermosetting resins and are frequently called conversion varnishes or catalyzed finishes...From an indoor air perspective, these varnishes are of interest because volatile organic compounds (VOCs), including formaldehyde, may be emitted during use...The long-lasting formaldehyde emissions can cause elevated concentrations in indoor environments.
A chart on that web page illustrates that it can take up to 3,000 hours for the level of formaldehyde emissions to drop to the level determined acceptable by the U. S. Department of Housing and Urban Development.
People sensitive to certain solvents may also have trouble with the off-gassing of the solvents in modern reformulated lacquers which are VOC compliant.
It is not difficult to conclude that the best choice in finishes from the perspective of health and safety, is certainly water based finishes.


Is your dining room table safe to eat off of?  If not, bring it to us, we would be happy to give you a nice new SAFE water based finish!

Friday, April 15, 2011

Making Buggy Wheel Spokes


 We were given an interesting little job recently.  Well, perhaps I shouldn't say 'little' as the work was not little,  although the finished product is quite small.  A customer of ours brought in the wooden wheel spokes that you see in the image above.  He had  hired someone to make these for him.  Unfortunately they just weren't shaped right so he came to us to see what could be done.

We started over shaping new spokes for the adorable buggy wheels you see in the image below.  The wheels look great and the new wooden spokes fit perfectly.  While this does not fit into our usual 'furniture' category,  we truly do enjoy working on interesting projects such as this.

Wednesday, April 13, 2011

Repair Gone Very Wrong!!

 We often see furniture brought to our shop that at some point in the past, had repairs done elsewhere.  Sometimes it was 50 years ago and it is just now needing more work,  but all to often it is a recent 'repair' that someone did, that just didn't do the job right.

This is what happened with this particular chair.   The problem this chair had initially was that the wood of the entire chair shrunk, but not the wood of the seat.  So all the seams holding the seat up were separating.   The chair should have been taken apart, glued back together so that it would be tight and sturdy, then the seat re-attached.  But instead, whomever tried to fix this chair did so by adding pieces of wood all over the place,  putting in nails and screws of all sizes and they even used some 'L' brackets to try and achieve stability!  This poor chair was a mess!   I have taken a picture of all the extra things that were added to try and make this chair stable,  It looks like they used half the hardware store!

Now this chair is going to need even more fixing than it would have before.  We will need to fill all those holes made by screws and nails,  Touchup all the holes to make them 'disappear' and then do the repairs that should have happened in the first place.

I write this post as a word of caution to you all.   There is a right way and a wrong way to fix your furniture,  if you don't know which is which,  don't try fixing it yourself!   Have a professional do it,  or at least bring it to us, so we can explain how it should be done.  You will save yourself quite the headache in the long run!

Saturday, April 9, 2011

Bentwood Rocker Gets a New Fancy Weave

 This seat belongs to a lovely bentwood rocking chair. While the seat is broken, we can still see an interesting grid pattern that was added to the weaving of this chair.  This grid is very unique, and we have not had a chair with this pattern come into our shop before.   Me being the curious person that I am, I had to do some research and find out what it's origin might be.  I learned quite a bit!


The design for this appealing bentwood chair goes back to the company’s founder Michael Thonet and his sons. In 1860, in the Moravian town of Koritschan, the Rocking Chair No. 1 was first manufactured using the new bentwood technique that is still being used today. The wood is heated with water vapour and then bent into the desired shape, which gives this rocking chair its particular charm. Michael Thonet developed the technique of bending solid beechwood in 1856. With his revolutionary CafĂ© House Chair No. 14, he was to receive worldwide acclaim.  These chairs often had hand caned seats and backs, and Thonet was the one to introduce this pretty grid pattern weave. It also has a double blind caned back, which is very fancy!

Our Furniture weaver did a lovely job on this seat and re-created that fancy pattern beautifully.   From  reports by the chairs owner,  This rocker has put to sleep many a child, and now with the seat in working condition again,  this rocker is ready for many more sleep inducing sessions!

Wednesday, April 6, 2011

Art Deco Chair gets a Unique Treatment

I am very excited about this project.  This chair is going to go in our office when it is completed, so there is a bit of a 'personal' investment I suppose.    Three matching chairs were dumped on us when the owners decided they didn't want them anymore.  We are finishing them each differently, and this is the last one.

We started out by painting it with a cream colored Milk Paint.  This Art Deco chair has interesting carving, so we are filling in all the little groves with red.  It is going to look so good.

Then once that step is completed we will do some glazing to add texture and a final coat of a Van Dyke Brown over the entire chair for an aged look.   I am sure I will post again as progress on this little chair continues.

I think the red is looking good!   What do you think?

Tuesday, April 5, 2011

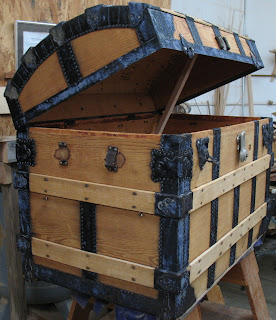
An 1870's Steamer Trunk comes out clean

 I have blogged about this trunk previously, to talk about it's age and such, but we just did some work on it and I am pretty impressed.    The owner of this trunk already had a good thing going, because there really isn't much structurally that needs to be repaired.  The leather handles and pull are shot and the locking mechanism is damaged.  The leather that once covered the outside was removed and we still need to make a new lid-stay to keep the lid up.
But the biggest thing that this trunk needed was a cosmetic face lift, which we made major steps to accomplishing recently.  After the old leather covering was pulled off we put the trunk through our cleaning tanks.  Not the stripping tanks mind you,  just the two cleaning tanks.  The wood came out so clean that all of us here at the shop have marveled at it,  it almost looks like new wood!   We have also treated it with 'Rust-Stop' which gives the metal a bluish-black look.  I like the look, but it is up to the customer to decide the final treatment of the metal, and of course the rest of the trunk.


Do you have an old trunk hiding away somewhere?  Bring it to us!  Let us make it beautiful for you again.

Monday, April 4, 2011

Jenny Lind bed gets a Makeover

A few posts ago I told you about this lovely 'Jenny Lind'  bed which had a broken spindle on it's footboard.   We were able to make a custom 'turned' new spindle to exactly match the old ones.  To read  more about this you can check out my older blog post here....

Since that post, the newly made spindle has been put in place, a new bedrail has been made to replace an old broken one and the entire finish has been restored.  Of course to do that restoration, we had to match the new spindle and new bedrail to the existing finish. Then the entire bed received a new water based top coat to make it shiny and new looking.

I think the work we did on this bed is pretty impressive.  You would never know from looking at it that a spindle had ever needed to be replaced!