Pages

Wednesday, January 18, 2012

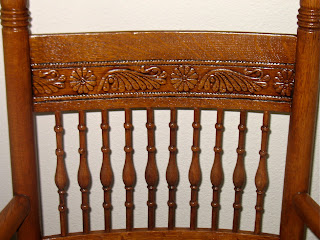
Machine Carved Platform Rocker

 We have completed work on this platform rocker,  and just in time to!  Its owner is having a baby any day now and will be putting this beautiful chair to use right away.  Fortunately,  the water based stains and finishes we use have almost no VOCs, zero fumes, and are quite safe for use on furniture than infants will be around.

As I was looking at this chair and taking photographs I noticed an interesting clue that tells us this is a mass produced rocking chair.  If you look at the carved panels (of which there are 3 on this rocking chair) you will notice that instead of being a balanced carving with a clear center and mirroring sides,  it seems to be a replicating pattern that could have easily been carved over and over by a machine.  But the real kicker is that the replicating pattern isn't  centered on the chair.  It looks as though a long strip of wood was machine carved, chopped into pieces and then bent into shape.
While this is a fine method for making furniture, and you end up with a sturdy piece with beautiful carving for a lower price, it would be better if the maker had at least paid a little attention to detail and centered the pattern in each chair.  If the middle of the three flowers on this rocking chair was one inch to the left, I probably would never have noticed the obvious mass production clue.  Or, if a more subtle carving design was chosen, that didn't have such distinct parts, then centering the design would not have been an issue at all.

Tuesday, January 17, 2012

Restoration of a Chippendale Chair Set

Chippendale is probably one of the most well known furniture makers and we had the pleasure of  working on a set of Chippendale style chairs in our shop.  Actually these two chairs are so old, they may be originals.

As you can see, they came to us in really bad shape.  One was completely in pieces but they both needed to be thoroughly re-glued.  As we have worked on this set of chairs some really interesting things became apparent to us.  These little things such neat historical clues.

The chairs have identical styling, as though they were made by the same furniture house, but they are also subtly different, as though different craftsmen made each one.  Notice how the arms are the same curve, same pattern, but one has a wider flair than the other.  One chair is also a tiny bit taller than the other.  They both have the same shell motif on the front of the seat, but one is carved a little more shallow then the other.  When we put together the way the joints were made,  the tight grain of the mahogany wood (which means it really has to be very old)  and the hand made details,  we begin to see that these are very very old chairs.
With a little bit of digging about the history of Chippendale design, it begins to look as though these are original, late 1700's chairs, probably made in the Chippendale design house itself, and definitely made in England.  English Chippendale furniture was made of Mahogany, whereas American manufacturers generally used Cherry.  Thomas Chippendale also employed 40+ craftsmen who all used the same patterns, but each worked on a piece until completion.  American makers used a more assembly style process which means that the slight variations in this chair have to be from English manufacture.

After we performed the extensive repairs and regluing that these chairs needed,  we prepped them for staining and then our customer came in and chose the stain color herself.  The color she chose, and that you see on these chairs in Dark Pine stain over Mahogany wood which gives a gorgeous rich  red color. After staining with our water based stains,  a glaze was applied so that the intricate carving that Chippendale chairs are known for,  could be fully emphasized.  Now all the chairs need is a new seat and they will be ready to grace the most elegant living room.
It has been such delight to bring these chairs back to life for our customer.  They were her grandmother's chairs and have been in dis-repair for as long as she can remember.  With such a beautiful history,  it is good to have the chairs look beautiful as well.

Thursday, January 5, 2012

Training an Apprentice

 We've got a new man at the shop!  While he is not quite a full-fledged 'craftsman' yet,  he is beginning to learn the tricks of the trade.  For his first day as an apprentice craftsman, he is working on the Lathe,  learning how to create replacement spindles for a Hall Tree.  In the forefront of the first picture you can actually see one of the existing spindles still stuck into the Hall Tree.  Our apprentice will need to successfully create two more spindles, to replace a few missing ones.  He starts out by cutting several pieces of practice wood to the correct length.  The exact centers must be found, and then a hole drilled into that spot.

Each block is put onto the lathe and smoothed into a cylindrical shape using a large, shallow carving knife.  Then, each of the curves from the existing spindle is measured with calipers and the measurements are then marked on the new spindle.  Using these markings, our apprentice then learned how to use various carving knives to contour the spindle.  Calipers were used each step of the way, to make sure the new spindle is exactly the same size as the old.

This is very tricky work for someone who doesn't have a whole lot of experience.  After watching the process the first time, he was able to complete a few spindles on his own, which is pretty impressive.  With each spindle, he got closer and closer to the desired effect and is just about ready to move on to the 'real' thing, which will be carved out of Redwood to match the rest of the Hall Tree.  Learning to work with wood in this fashion is a pretty unique thing in our modern world.  Other then high school woodshop class, there aren't a lot of opportunities for a person to learn this trade from an expert.  That is why it is so exciting for us to be able to take on and train an apprentice.  It means that the skills required to turn broken furniture into beautiful, functional furniture, will last into the next generation.

Monday, January 2, 2012

Biscuit Joint on High Chair Seat

I showed you all pictures of this high chair when it was in 18 pieces, a few posts back.  Well, we are moving forward with the project and are to the point where we need to put the seat back together.  The high chair is made of maple, and the seat is pieced together. The combination of those to factors caused a very common problem.  Maple very frequently looses moisture over time which causes it to shrink.  When the wood shrinks, the joints separate and the seat falls apart.  In addition to the shrinkage problem,  the way these type of seats used to be put together was with a 'butt joint'.  Meaning that it was two flat pieces of wood stuck together with glue.  This isn't a particularly strong type of adhesion method!
To fix the problems with this seat we started out by cleaning any old glue off of the pieces of the seat so that we have a clean work surface.  If this step is skipped, then any new glue could just adhere to the old glue, not to the wood, and the joints would fail again.  We then used what is called a 'Biscuit Joint' to secure the pieces together.  Small grooves were cut in the wood using a 'biscuit jointer'.  This is an exacting job, as the grooves need to be perfectly aligned. A thin oval shaped piece of wood called a 'biscuit' is then glued into one set of grooves.  Once the glue is dry, the same biscuit, attached now to a piece of wood, is glued into the matching set of grooves on the other piece of wood.  This process, if done well, leaves a very tight, sturdy joint that is completely invisible.